Marie Browning

"Inspiring and honoring creativity"

Blog Hop with Jen Goode! November 14, 2014

This weekend we are blog hopping with our guest designer Jen Goode! If you have just come from Jennie Garcia’s blog you are on the right track! If not, go back to the beginning on the Tombow Blog for a chance to win a fabulous prize set of Bright Tombow Markers!

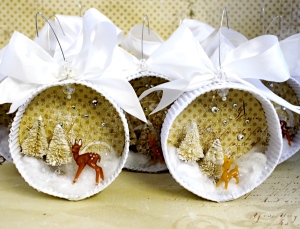
Do you have an ornament exchange party this season? Here’s a great project that I created and made 15 in 1 evening with the help of Tombow Adhesives!

IMG_1359

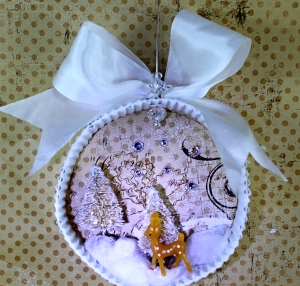
Here is the finished shadow box ornament.

IMG_1331

Here are the Tombow Products you will need:

  • Xtreme Adhesive
  • Mono Multi Liquid glue
  • Mono Aqua Liquid glue
  • Power Tabs
  • Dual Brush Pens to color stampings

IMG_1330

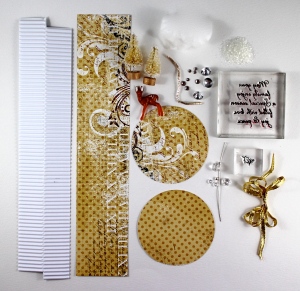
Here’s the supplies you need to make ONE ornament:

  • one 10″ x 2″ piece of corrugated cardboard – with 1/2″ notches at each end and scored in half (see photo above for grain direction)
  • one 10″ x 2″ and two 3″ circles cut from decorative cardstock  (paper from Bo Bunny)
  • one cotton ball
  • rhinestones – variety of sizes
  • glitter (Art Institute Glitter)
  • Scene elements – I used two miniature bottle brush trees and a deer
  • Stamps to add a sentiment to the back (sample from Stampendous)
  • Beaded hanger – 3″ headpin and beads
  • Ribbon Bow (I show a gold bow here but ended up using a white bow!) Ribbon from May Arts 

IMG_1332

Step 1: Using the Xtreme Adhesive , (Xtreme is a perfect choice for quick, strong adhesion!) glue the decorative paper panel into the folded corrugated piece. Fringe cut the decorative paper every 1/4″

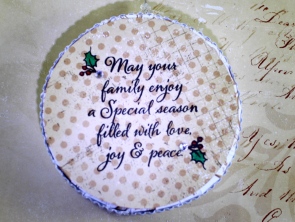
Step 2: Before going to the next step, stamp and color one of the circle pieces using the Dual Brush Pens.This will be the back of the ornament.

IMG_1333IMG_1362

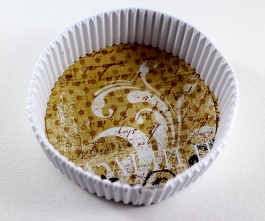
Step 3: Form the shadow box into a circle and glue ends together using the Mono Multi. Use a clothespin to hold while drying. Fold in the fringes and using the Mono Multi, glue the circles to the inside and back to form the circular shadow box. With the shadow box made, I then glued in rhinestones on both sides using the Mono Multi (the fine tip is easy to control to make tiny drops of glue).

IMG_1363

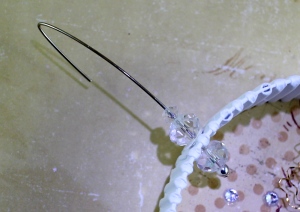
Step 4: Create the beaded hanger by punching a tiny hole at the top of the shadow box. Add some beads to the headpin, then place through the hole. Continue to add a few more beads. Add a tiny drop of Mono Multi Glue in-between each bead.  Fold the top of the headpin to form the hanger.

IMG_1354

Step 5: I added glitter to the trees by rolling them in a puddle of  Aqua Glue and then sprinkling on the glitter. (Aqua is my main go-to glue for adding glitter!) The glittery forest was so pretty!

IMG_1361

Step 6: Build your scene! Tear apart the cotton ball and drizzle some Aqua Glue on. Mix it gently by pulling the cotton apart and place into the shadow box (yes, I know, a little messy but Aqua washes away easily with a wet wipe).Glue in the trees and the deer with the Multi Glue. Sprinkle on some glitter and set aside to dry.

IMG_1364

Step 7: Add a bow to the top with a Power Tab and you’re finished! The Tombow Adhesives allowed me to speed through this project with great results! Make sure you ask Santa for your favorite Adhesives this holiday!

bloghop_jen Goode

In order to be qualified to win this amazing PRIZE,Tombow’s Dual Brush Pen Bright Set, PLEASE comment on each of the designers projects. We will announce a winner Monday, November 17. Now go to our guest designer Jen Goode’s Blog to see what she has created for you!
 

Sticky Note Package February 3, 2013

It’s not too late to make some gifts for friends and co-worker this season! This paper package holds a pad of sticky notes and would be a welcomed gift for any office worker or busy mom. Check out Tombow’s Fine Pens , they would be a welcomed companion gift to the package! Tombow adhesives makes it fast and easy to make and insures it will hold together. Change it up by using papers and embellishments to match your recipient’s style.

I used paper and embellishments from the Art Angel collection from Cosmo Cricket.

I used the Mono Multi liquid Glue for the box and cover construction and added the panels using the Dot Adhesive. The belly band holds the container closed and also works as an easel to hold the lid up when using the sticky notes. The Fastener Tabs makes both these functions possible!

The decorative chip boards decorates the inside lid and a Power Tab is used to hold a button embellishment to the belly band. I’m showing the package here with both an open and closed view. My favorite Tombow pen, the Zoom 727 Ballpoint Pen, is also shown.

Want to see complete instructions for this project? Go to Scrapbooking.com for the dimensions and step-by-step instructions!


New Pencil DoodleDab September 11, 2012

Here’s a fun new DoodleDab to celebrate the start of a new school year. It’s amazingly easy to do using Tombow’s Dual Brush Pens!

The Pencil DoodleDab is great for creating fun cards, notepaper or to decorate your envelopes. Here’s how to draw the Pencil DoodleDab:

General: The suggested Dual Brush Pen colors are shown on the right.

1. Start by making a line using the yellow marker’s brush tip. Make it as long as you want your pencil to be.

2. Add two more lines one each side of the first line, overlapping as you go.

3. With the brush tip of the black marker, make a teardrop stroke about 1/2″ away from the barrel of the pencil.

4. With the fine tip of the black marker, draw lines from the point to the sides, add a wiggly line on top of the barrel, outline the sides and bottom of the barrel, add three short, slightly curved lines at the bottom and draw a square at the base for the eraser. Color in the eraser with the pink marker.

5. This step is optional. Add a shadow to the side of the pencil with the grey marker’s brush tip. You can also use the grey marker’s fine tip to add “HB Pencil” to the barrel if you wish.

Have some fun using some the 96 different colors available in the Dual Brush Pen selection! The cards were put together using Dot Adhesive, MONO Multi Liquid Glue, and Foam Tabs.

Thanks for dropping by! Please comment if you like the new Pencil DoodleDab!


Quotable Panels August 20, 2012

I love the new ‘Shadow Panels’ from Walnut Hollow! I enhanced the feature of the panel standing out 1/2″ from the wall by using Foam Tabs on the front to create even more dimension. I have always been a fan of Walnut Hollow’s beautiful wooden surfaces. They are always constructed with perfectly straight edges and smooth sanded surfaces ready for almost any art medium. A big bonus is they are manufactured in the USA with award-winning dedication to environmental sustainable practices.

With this photo angle I tried to show how the panels stand out from the wall and the dimensions with the panels on the front. The photo does not do them justice, it’s a really cool effect that gives that extra interest to an arrangement.

For this panel, I trimmed paper panels from Graphic 45’s Kraft Reflections and Olde Curiosity Shoppe Collections. The main cardstock background pieces, for the top and sides, were adhered on with MONO Aqua Liquid Glue. This glue works perfectly with paper to wood applications! A secure bond with no wrinkles! You can also use it for a finishing coat that dries to a nice semi-gloss finish. After the background papers are glued on and dry, you can attach all the other paper pieces with Dots Adhesive Stamp Runner. The clear dome cabochon was glued over the eye motif with MONO Multi Liquid Glue and the quote was attached using the Foam Tabs.

This shadow panel was done in the same manner with the quote panel and one of the flying pig motifs added with the Foam Tabs. You can easily double-up with the tabs to lift the image even higher off the panel. The bottles on top were added using Power Tabs, which holds them securely and in your desired positions. I use both the Foam Tabs and Power Tabs in all my mixed-media pieces!

I love reading your comments, so let me know how you like this weeks project and what your favorite Tombow Adhesive is when working on mixed media projects!

If you enjoyed this post please follow us on http://www.facebook.com/tombowusa and http://twitter.com/#!/tombowusa