Marie Browning

"Inspiring and honoring creativity"

Blog Hop with Jen Goode! November 14, 2014

This weekend we are blog hopping with our guest designer Jen Goode! If you have just come from Jennie Garcia’s blog you are on the right track! If not, go back to the beginning on the Tombow Blog for a chance to win a fabulous prize set of Bright Tombow Markers!

Do you have an ornament exchange party this season? Here’s a great project that I created and made 15 in 1 evening with the help of Tombow Adhesives!

IMG_1359

Here is the finished shadow box ornament.

IMG_1331

Here are the Tombow Products you will need:

  • Xtreme Adhesive
  • Mono Multi Liquid glue
  • Mono Aqua Liquid glue
  • Power Tabs
  • Dual Brush Pens to color stampings

IMG_1330

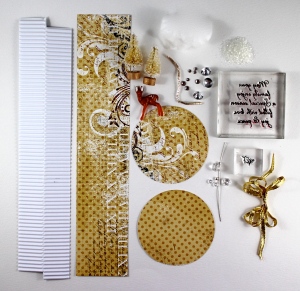
Here’s the supplies you need to make ONE ornament:

  • one 10″ x 2″ piece of corrugated cardboard – with 1/2″ notches at each end and scored in half (see photo above for grain direction)
  • one 10″ x 2″ and two 3″ circles cut from decorative cardstock  (paper from Bo Bunny)
  • one cotton ball
  • rhinestones – variety of sizes
  • glitter (Art Institute Glitter)
  • Scene elements – I used two miniature bottle brush trees and a deer
  • Stamps to add a sentiment to the back (sample from Stampendous)
  • Beaded hanger – 3″ headpin and beads
  • Ribbon Bow (I show a gold bow here but ended up using a white bow!) Ribbon from May Arts 

IMG_1332

Step 1: Using the Xtreme Adhesive , (Xtreme is a perfect choice for quick, strong adhesion!) glue the decorative paper panel into the folded corrugated piece. Fringe cut the decorative paper every 1/4″

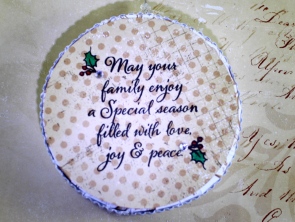
Step 2: Before going to the next step, stamp and color one of the circle pieces using the Dual Brush Pens.This will be the back of the ornament.

IMG_1333IMG_1362

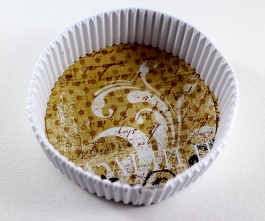
Step 3: Form the shadow box into a circle and glue ends together using the Mono Multi. Use a clothespin to hold while drying. Fold in the fringes and using the Mono Multi, glue the circles to the inside and back to form the circular shadow box. With the shadow box made, I then glued in rhinestones on both sides using the Mono Multi (the fine tip is easy to control to make tiny drops of glue).

IMG_1363

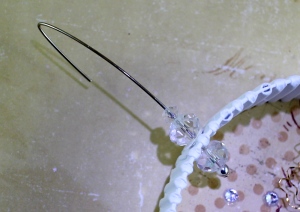
Step 4: Create the beaded hanger by punching a tiny hole at the top of the shadow box. Add some beads to the headpin, then place through the hole. Continue to add a few more beads. Add a tiny drop of Mono Multi Glue in-between each bead.  Fold the top of the headpin to form the hanger.

IMG_1354

Step 5: I added glitter to the trees by rolling them in a puddle of  Aqua Glue and then sprinkling on the glitter. (Aqua is my main go-to glue for adding glitter!) The glittery forest was so pretty!

IMG_1361

Step 6: Build your scene! Tear apart the cotton ball and drizzle some Aqua Glue on. Mix it gently by pulling the cotton apart and place into the shadow box (yes, I know, a little messy but Aqua washes away easily with a wet wipe).Glue in the trees and the deer with the Multi Glue. Sprinkle on some glitter and set aside to dry.

IMG_1364

Step 7: Add a bow to the top with a Power Tab and you’re finished! The Tombow Adhesives allowed me to speed through this project with great results! Make sure you ask Santa for your favorite Adhesives this holiday!

bloghop_jen Goode

In order to be qualified to win this amazing PRIZE,Tombow’s Dual Brush Pen Bright Set, PLEASE comment on each of the designers projects. We will announce a winner Monday, November 17. Now go to our guest designer Jen Goode’s Blog to see what she has created for you!
 

Blog Hop with Lily Criswell August 8, 2014

So happy to be blog hopping with guest designer Lily Criswell! Our amazingly talented guest is only 9 years old and already a seasoned designer! Play along and have a chance to win Tombow product! If you just came from Jennie’s blog, you are on the right track! If not you may want to start at the Tombow Blog. It’s also back to school time so Mom’s can celebrate by crafting this elegant pencil box – not for the children, it’s for you! 

IMG_0904I started by re-purposing a box I had. With some book pages and Tombow’s Aqua Liquid Glue I decoupaged on the sides and on the inside. Aqua Glue is a amazing glue for this purpose, and the build in applicator makes it mess free! I simply cut book pages to fit the sides and applied an layer of Aqua to attach. I also brushed on a coat of Aqua on top to give it a nice matte finish. Do you see the book page pencil? Yes, Aqua worked perfectly to cover the pencil as well! 

IMG_0905

I also added book pages on the inside – I didn’t worry about tears and wrinkles as I liked the distressed look! The ribbon handle and front label embellishment were added using Power Tabs for a strong, lasting hold. When dry I filled it with my essentials; Tombow Correction Tape, Xtreme Adhesive, Drawing Pencils and a Fudenosuke Brush Pen.  Now I’m all set to mark my fridge calendar with upcoming events!  

blank blackboard sign

Now to win a package of Soft Primary Irojiten Colored Pencils and Xtreme Adhesive please comment on all the Design Team’s projects as well as liking the TombowUSA Facebook page! Your next stop is Lily’s blog to see what she has created for you! 


Blog Hop with Tombow, DCWV, & May Arts June 23, 2014

Blog-hop+DCWV+MayArts+Tombow

Welcome to the Triple Threat Blog Hop with DCWV, May Arts and Tombow! All this week designers from these great companies will be sharing projects using DCWV’s Honey Chic stack, beautiful ribbon from May Arts and adhesives from Tombow.

If you have come here from Valerie’s Blog, then you are on the right track! If not, you can go back to any of the company websites and start the hop from there!

IMG_0678

I have designed three pages for the hop including some hints on adding ribbon and trims. On this page, diagonal striped cardstock was used as a base with coordinating papers from the stack. The cardstock panels and photo were first arranged using the Removable Adhesive to plan the page design. For the permanent bond, Permanent Adhesive was used.

IMG_0678

I attached teal satin ribbon using Xtreme Adhesive for a quick and secure bond. Multi Liquid Glue was used to glue small motifs from the paper under clear cabochons to create the floral embellishments. Multi dries quickly and crystal clear, perfect for this task.

IMG_0676

To manage the Light Blue Raffia Bow trim, I adhered it, right side down, to a scrap piece of paper using the Removable Adhesive. Then with the Multi Liquid Glue, I added a tiny drop of glue to each bow and let dry clear. It was then super easy to attach it exactly where I wanted it without any excess adhesive showing – a perfect solution for hard to attach ribbon and trims!

IMG_0679

It was fun to choose different papers from DCWV’s Honey Chic Stack, I was always able to match my  photos!

IMG_0679

The blue flat marble embellishments were done using the Multi Liquid Glue and the paper panels again arranged using the Removable Adhesive. With the Yellow sheer ribbon with butterflies, a strip of Xtreme Adhesive was added to the page and then the ribbon was ‘messy pleated’ in place. I also added the Green with polka dot ribbon and the yellow tulle gathered under the journaling panel with the Xtreme Adhesive. The final placement of the panels were adhered down using both Dots Adhesive and Foam Tabs.

IMG_0677

This final page used the same techniques. Xtreme for the flat ribbon, Multi to create the acrylic gem embellishments and the Multi glue technique for the diamond chain. I loved the cute canvas with bunnies ribbon and the sparkly diamond chain from May Arts Another notable hint is to use Aqua Liquid Glue on ribbon ends to prevent them from fraying! IMG_0677

Be sure to visit all the blogs today and leave comments for your chance to win some great prizes! Three lucky readers will win a Triple Threat prize pack of you own, including a stack from DCWV, a spool of ribbon from May Arts and Xtreme Adhesive, Power Tabs, Removable Adhesive and Fastener Tabs from Tombow. Winners will be chosen from comments throughout the week, so make sure you check back daily to increase your chances of winning! Also, please make sure you have popped on over to Facebook and “liked” each of the company pages (DCWV / May Arts / Tombow), because really, what’s not to like?!

Now, head on over to Rita’s Blog to see what kind of craftiness she has in store!


Debbie’s Challenge: Glittery Radiant Orchid February 3, 2014

For Debbie’s challenge, we are using the Pantone’s Color of the Year: Radiant Orchid! As it is so close to Valentine’s Day, I thought a cute ‘n quick card would be fun!

IMG_2962I really wanted to do something with candy, but alas, no candy stamps (I have so many stamps you would think I would have one with candy!) So I made one using a favorite Penny Black stamp! I stamped the ‘Cheesecake Wishes’ stamp, but masked off the dandelion wishes. IMG_2961I did it by making a mask by stamping the image onto a piece of 20 lb. copy paper. Cut out what I didn’t want, and adhered it temporarily with the Removable Adhesive and stamping the image.IMG_2963I added in a lollypop and a tongue for cheesecake using the MONO Twin Permanent Black Marker. Easy to draw stuff, don’t panic…if you need to, use a very light pencil mark to help.IMG_2964Color the image using the Dual Brush Pens, including of course, the #685 Color of the Year! I also added a few heart DoodleDabs to the image. IMG_2965Now the challenge called for glitter, so to bling it up a bit, out came the Art Institute Glitter. The glittered swirls and outlines around the hearts were added with the Glue Pen and pale pink glitter. The lollipop used the MONO Aqua Liquid Glue and Angel Dust Glitter. IMG_2966

Here’s the finished card! Thanks for the challenge Debbie! It was Sweet!


Blog Hop with Cabio Tse December 9, 2013

The Tombow Design Team is blog hopping this week with talented guest designer Cabio Tse. If you just came from Jennie’s blog you are on the right track! If not, and you want a chance to win a prize, go back to Tombow’s Blog and follow the projects!

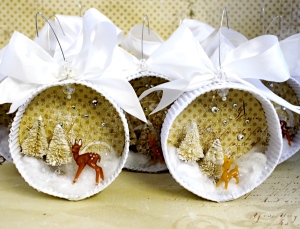
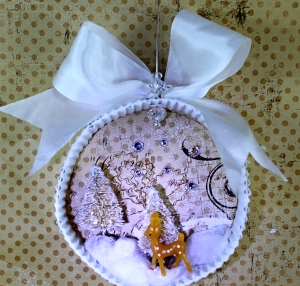
IMG_2380I have long admired vintage shadow boxes, and decided to create some to hang on the tree this season. Authentique Papers inspired this project, along with this beautiful quote printed on their cardstock;

“We have only this moment, sparkling like a star in out hand and melting like a snowflake” Marie Ray

IMG_2353I constructed the shadow box using corrugated cardstock and the gorgeous winter themed cardstock from Authentique’s Glistening Collection. The box was put together using Multi Liquid Glue for a nice strong bond.

IMG_2355

IMG_2356To create the snowy scene, I glued in pulled-apart cotton balls using Aqua Liquid Glue. I then dribbled Aqua glue all over the ‘snow’ and sprinkled with vintage clear glass glitter. A few drops of Multi glue on the bottle brush trees and miniature deer held the winter scene together.

IMG_2381

IMG_2384Here are two more vintage box designs – they were so fast and fun to put together!

Blog Hop_CT

Enter to win these great Tombow Products! MONO Multi Liquid Glue, Irojiten Colored Pencils, MONO Removable Adhesive and MONO Removable Adhesive Refill. Make sure to comment on all the Design Team’s projects! The winner will be announced Friday Dec. 13 at 3:30 pm EST.

Now go to Cabio’s Blog to see what wonderful project she has created!


Adventures Photo Box by Marie Browning June 13, 2013

Tombow_imaginisce_summer

Welcome to the Imaginisce/Tombow “Summer isn’t a Bummer” Blog hop! This is the final day of the hop and we’re so glad you’re with us! This week, Imaginisce and Tombow have teamed up to get you in the summer spirit.  Both design teams are excited to show you just what we have done with the Hot Rocks as well as My Endless Summer and Outdoor Adventure collections from Imaginisce, and Tombow’s Dual Brush Pen Markers and amazing adhesive products. I am the first person on Today’s hop!
IMG_1395For my post I am using the wonderful Outdoor Adventure papers and stickers from Imaginisce along with Tombow’s liquid Glues. I wanted to do something different with the papers and I decided on a photo box to hold photos from family adventure vacations. The papers were perfect for this and there were loads of stickers and die-cuts from the collection to choose from. I choose the papers to cover both the outside and inside of the box and both sides of the lid, trimming each panel  1/4″ smaller. I then used a coordinating acrylic paint and painted every edge on the box and lid. All the panels are attached using Mono Aqua Liquid Glue from Tombow, my go-to glue for paper onto wood. It goes on clear, dries clear with a matte finish and with no wrinkles! It also has the advantage of a brush applicator so no messy brushes or washing up!

IMG_1396I then designed some  ‘title divider ‘ pages to separate the different years and adventures of photos. Each divider was trimmed from the Outdoor Adventures paper to fit into the box. I then decorated the front of each divider with a photo from that year  and stickers from the collection. The photos are attached using Tombow’s Dot Adhesive Stamp Runner. It allows me to use it as a traditional stamp runner around the edges and also ‘stamps’ small squares of adhesive in the middle of the photo. I attached the little date tags at the top using Mono Multi Liquid Glue for a super strong hold for these soon to be tugged on pieces!

IMG_1398On the back side of each title divider page, I added journal tags and die-cuts from the Outdoor Adventure Collection, ready to add the details. Again, the Dot Adhesive Stamp Runner was used to secure everything down.

IMG_1399Here’s a peek of the finished box loaded with photographs from past adventures, with room for lots more! A great idea for those of us who have not printed out all our favorite photographs – now we have a place to put them!

IMG_1400Thanks you Tombow for your wonderful glues and Imaginisce for the amazing papers! Be sure to visit all the projects featured this week and leave a comment for your chance to win!  You also must ‘like’ both Imaginisce and Tombow on Facebook .

Imaginisce will be giving giving away a collection pack of the Outdoor Adventure Collection. The same one I used in this blog!

ImageLibrary126And one lucky winner will win an amazing package of Tombow products including Dual Brush Pen Set, 10 Jellybean, MONO Adhesive Dots Value Pack of 3 applicators, and Power Adhesive Tabs.

Bloghop_Imaginisce
Make sure you remember to ‘like’  both Tombow and Imaginisce to be eligible for the prizes and more you comment, the more chances you have to win!

Now, head on over to Michelle to see what kind of craftiness she has in store!

If you enjoyed this post please follow me on:

Facebook

facebo

Twitter

twitter


Sew Nice ATC January 25, 2013

I love to make Artist Trading cards – they are a great way to use up precious little bits and trinkets. Having Tombow adhesives, coloring pens and pencils handy means you are always ready to create these little works of art.

The card started out by adhering a book page to a piece of cardboard cut into the ATC size of 2.5″ x 3.5″. The MONO Aqua Liquid Glue is my favorite glue for laminating papers together! After the glue has dried, I antiqued the edges of the card with the Dual Brush Pens numbers 990, 992 and 977. I wanted a softer coloring for the stamped images, so used the Irojiten Colored Pencils, Deep Tone 1 colors.

I then added a piece of pink embroidery thread is wrapped around the bottom and a strip of fabric tied into the corner. Use Foam Tabs to attach the needle case image and push trinket pins into the foam for a secure and handy hold. Power Tabs cut into smaller 1/4 pieces were used to instantly attach the buttons to the finished card.


Image Transfer “Tip-nique” November 1, 2012

Image transfer is a technique where you can adhere a piece of treated paper to a surface and render the image translucent. The sample shows a frame with the wood grain showing through the translucent image transfers for a romantic, vintage appearance. Light backgrounds usually work best with this technique but you can experiment with medium or dark backgrounds for interesting effects.

Step1: Apply a liberal amount of MONO Multi Liquid Glue to the front of the image using the broad applicator. Problems can occur if you do not apply enough glue. I left a slight unglued edge around the image that will give a distressed edge. If you wish a squared edge, make sure the glue is applied right to the edges. Immediately lay the image down onto the surface of the frame, image side own. Burnish softly with a damp cloth and avoid getting glue on backside of the image. Let the glue dry completely, overnight is best. With this technique, the image will be in reverse, so choose papers without words. If you want to use words with your own images, make a mirror image color photocopy (an ink-jet printer does not work).
 
 
Step 2: Spray the image with water and let it soak into paper. Gently peel off the paper by rubbing in small circles with your fingers. Remove the paper until you can see the image. If you scrub too vigorously, you may scrub away the image. Be gentle with the edges.
 
 
Step 3: Wipe off image and let dry – you can use a hair dryer to speed up the drying. When dry, you will see a white haze on the image, this means you need to repeat the water step and remove more paper. You can repeat this step until your image feels smooth. You will always have a little white haze on the image. It will disappear after you seal the image with two coats of clear matte acrylic varnish.


Step 4: Motifs from the decorative paper are cut out and adhered using the MONO Aqua Liquid Glue. These are a nice contrast to the translucent images.
 
 
Step 5: Add your embellishments. The keys were glued on with MONO Multi Liquid Glue and the flowers,
bows and flat marbles with Power Tabs.

This is a fun project and would make a great gift. Give it a try, you’ll be amazed at the results.
Until next time, happy crafting….

If you enjoyed this post pleas follow us on http://www.facebook.com/tombowusa and http://twitter.com/#tombowusa


Monday “Tip-niques” ~ “Playing with Fine Paper” October 8, 2012

MONO Aqua Liquid Glue works extremely well for adhering fine handmade papers such as thin tissue paper or other very
thin papers to cardstock, chipboard or wooden surfaces. The glue can also be applied to the top surface of the glued on papers to make them translucent.

Many different types of fine, thin papers can be used with this technique including gauzy fine Japanese papers, tissue papers, ephemera such as old dress patterns or old book pages
and thin handmade papers. For the sample shown here, I used printed tissue paper and handmade mulberry paper adhered onto printed cardstock.

Using the broad applicator, cover the surface of your paper with a thin layer of MONO Aqua. Use the brush on the applicator too smooth and even it out. Place the thin paper in position onto the cardstock.

Apply as many layers or pieces as you wish. When finished, apply a thin layer of MONO Aqua to the top of the papers. Carefully, as the thin paper is very delicate when wet, use your finger to smooth out any wrinkles. As you can see, the paper takes on a lovely translucent look.

Let the glue dry. Depending on how much you used, this may take a few hours. You can dry it immediately with a heat tool. The glue is matte when dry providing a nice finish. The cardstock
wrinkles, which is a nice effect or can be flatten when glued down to a surface with Permanent Adhesive. Glue under any overhanging pieces, or tear the edges and leave them depending on the effect you wish.

There are so many possibilities, I hope you have fun with your Fine Paper Crafting. See you again next week with more “Tip-niques”

If you enjoyed this post please follow us on http://www.facebook.com/tombowusa and http://twitter.com/#tombowusa


“No-Sew” Fabric Embellishments September 28, 2012

Here are some easy no-sew fabric
embellishments that can be made with Tombow’s MONO Multi and MONO Aqua liquid glues.

Chipboard Flower – Start with a simple shape, like this large blossom chipboard tag from Bazzill, and use MONO Aqua Liquid Glue to glue on the fabric. Cut the fabric around the edge leaving a ¼” overhang of fabric. Let dry a few minutes and fray the excess fabric by pulling out threads with your fingers. Covering a 1” cardstock circle with the MONO Multi Liquid Glue makes the center ruffle. Let the glue dry completely and then finger ruche the fabric strip around the edge. Attach the ruffle and center with Power Tabs and add decorative pins and a cord to finish.

Fabric Rosette – Punch out a 1” cardstock circle and cover with MONO Multi Liquid Glue. Let the glue dry completely and then finger ruche the fabric strip around the edge. The center is a flattened bottle cap and clear cabochon from The Bottle Cap Company. They are all glued together with MONO Multi and Power Tabs. Decorate with a decorative pin and stamped paper strips edged with Dual Brush Pens.

Ruffled Edge – This ruffled edge on cardstock is created with the MONO Multi Liquid Glue. Simply apply the glue onto the page in a ½” thick strip and let dry completely. The fabric is then ‘messy pleated down the dry but sticky glue. I then add a little MONO Multi to both ends to make sure the ruffle does not come off the page.

Wrinkled Fabric Panels – You can also create wrinkled fabric panels that are not glued to the paper. This allows you to create interesting panels that keep the wrinkled shape and attached anywhere on your page or card design.

Wrinkled Panel Step 1

Work on a silicon mat, like the Splat
Mat from Bazzill. Apply a thin coating of MONO Liquid Glue onto the mat using the broad applicator.

Wrinkled Panel Step 2

Place the fabric panel into the glue and apply a top layer of glue. Use your finger to smooth out the glue. You can choose to leave the fabric panel

smooth, let it dry and then peel of the mat and glue to your surface, or follow the next step for a wrinkled panel.

Wrinkled Panel Step 3

You can also wrinkle the fabric up and then let it dry. The photo shows what it looks like before the glue has dried. Peel
it off the mat and you now have a matte finish, wrinkled piece of fabric that will keep its shape. Use Tombow Aqua, Multi or Permanent Adhesive to attach to your cardstock.

Stay
tuned to the blog for more fabric embellishments

If you enjoyed this post please follow us on http://www.facebook.com/tombowusa and http://twitter.com/#tombowusa