Marie Browning

"Inspiring and honoring creativity"

Blog Hop with Jen Goode! November 14, 2014

This weekend we are blog hopping with our guest designer Jen Goode! If you have just come from Jennie Garcia’s blog you are on the right track! If not, go back to the beginning on the Tombow Blog for a chance to win a fabulous prize set of Bright Tombow Markers!

Do you have an ornament exchange party this season? Here’s a great project that I created and made 15 in 1 evening with the help of Tombow Adhesives!

IMG_1359

Here is the finished shadow box ornament.

IMG_1331

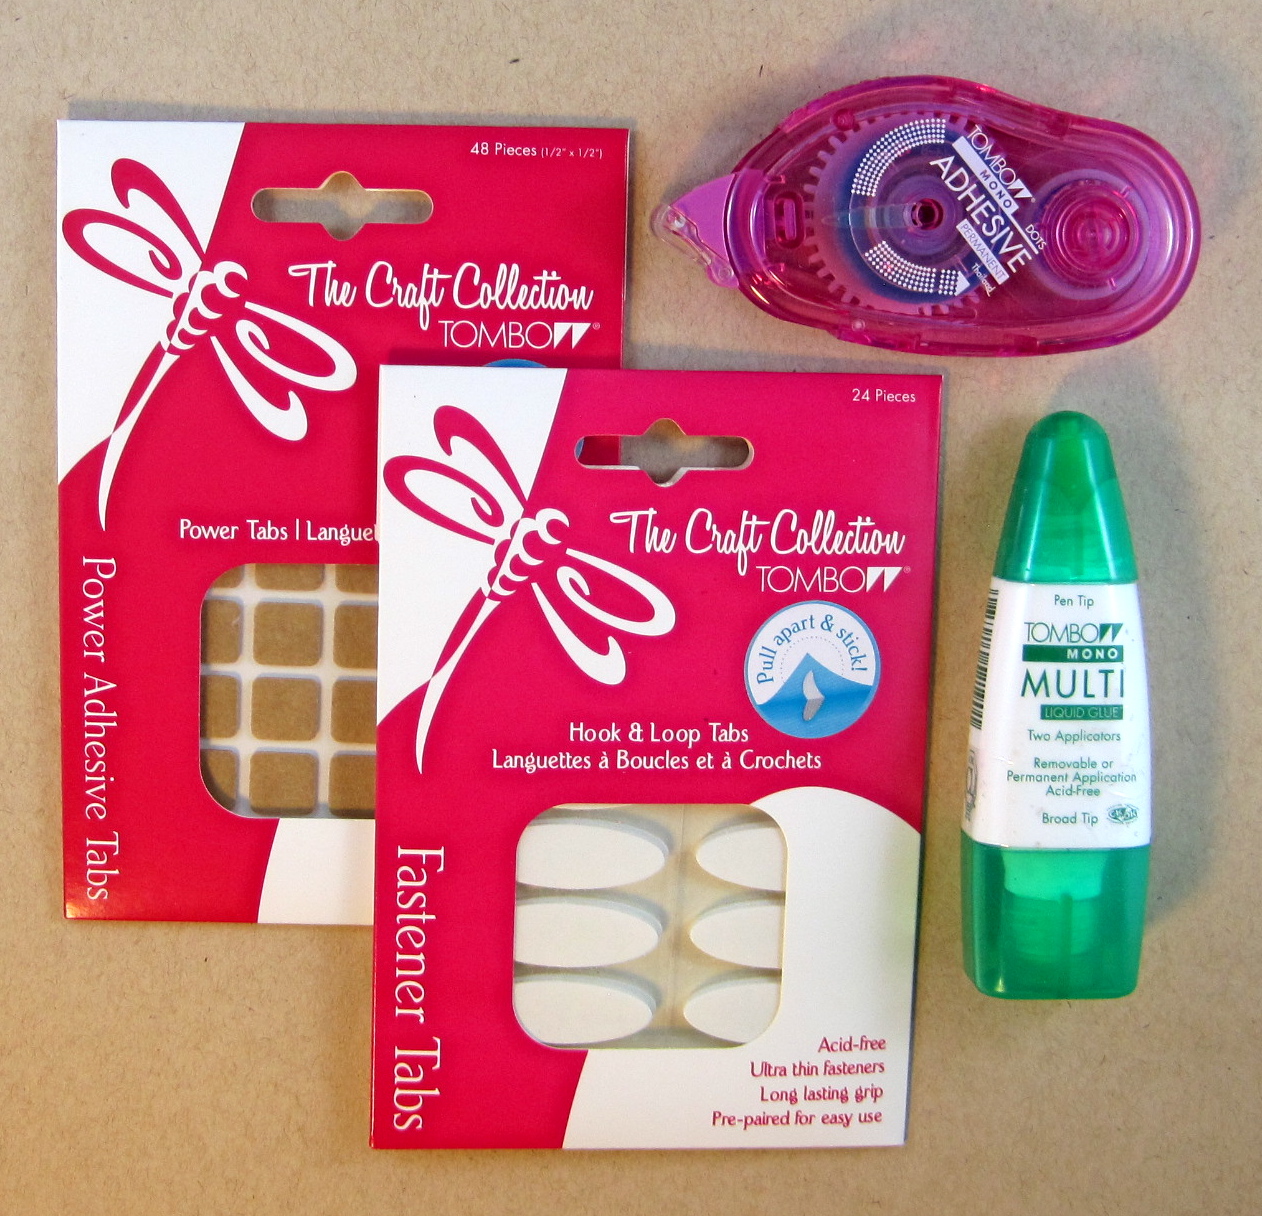
Here are the Tombow Products you will need:

  • Xtreme Adhesive
  • Mono Multi Liquid glue
  • Mono Aqua Liquid glue
  • Power Tabs
  • Dual Brush Pens to color stampings

IMG_1330

Here’s the supplies you need to make ONE ornament:

  • one 10″ x 2″ piece of corrugated cardboard – with 1/2″ notches at each end and scored in half (see photo above for grain direction)
  • one 10″ x 2″ and two 3″ circles cut from decorative cardstock  (paper from Bo Bunny)
  • one cotton ball
  • rhinestones – variety of sizes
  • glitter (Art Institute Glitter)
  • Scene elements – I used two miniature bottle brush trees and a deer
  • Stamps to add a sentiment to the back (sample from Stampendous)
  • Beaded hanger – 3″ headpin and beads
  • Ribbon Bow (I show a gold bow here but ended up using a white bow!) Ribbon from May Arts 

IMG_1332

Step 1: Using the Xtreme Adhesive , (Xtreme is a perfect choice for quick, strong adhesion!) glue the decorative paper panel into the folded corrugated piece. Fringe cut the decorative paper every 1/4″

Step 2: Before going to the next step, stamp and color one of the circle pieces using the Dual Brush Pens.This will be the back of the ornament.

IMG_1333IMG_1362

Step 3: Form the shadow box into a circle and glue ends together using the Mono Multi. Use a clothespin to hold while drying. Fold in the fringes and using the Mono Multi, glue the circles to the inside and back to form the circular shadow box. With the shadow box made, I then glued in rhinestones on both sides using the Mono Multi (the fine tip is easy to control to make tiny drops of glue).

IMG_1363

Step 4: Create the beaded hanger by punching a tiny hole at the top of the shadow box. Add some beads to the headpin, then place through the hole. Continue to add a few more beads. Add a tiny drop of Mono Multi Glue in-between each bead.  Fold the top of the headpin to form the hanger.

IMG_1354

Step 5: I added glitter to the trees by rolling them in a puddle of  Aqua Glue and then sprinkling on the glitter. (Aqua is my main go-to glue for adding glitter!) The glittery forest was so pretty!

IMG_1361

Step 6: Build your scene! Tear apart the cotton ball and drizzle some Aqua Glue on. Mix it gently by pulling the cotton apart and place into the shadow box (yes, I know, a little messy but Aqua washes away easily with a wet wipe).Glue in the trees and the deer with the Multi Glue. Sprinkle on some glitter and set aside to dry.

IMG_1364

Step 7: Add a bow to the top with a Power Tab and you’re finished! The Tombow Adhesives allowed me to speed through this project with great results! Make sure you ask Santa for your favorite Adhesives this holiday!

bloghop_jen Goode

In order to be qualified to win this amazing PRIZE,Tombow’s Dual Brush Pen Bright Set, PLEASE comment on each of the designers projects. We will announce a winner Monday, November 17. Now go to our guest designer Jen Goode’s Blog to see what she has created for you!


Debbie’s Dollar Store Challenge November 3, 2014

Filed under: Uncategorized — mariebrowning @ 10:49 am
Tags: , ,

IMG_1310

What a great challenge Debbie! I’m going to show you how to make Mini Cupcake Cloches using Tombow’s Power Tabs! This idea is great for a presentation of mini cupcakes or handmade goodies for a tasty gift – with the best part you are really giving them a set of stemless wine glasses! I picked up some clear glasses, plastic beads and beaded trim at the dollar store. You will also need some cabinet knob bases or flat-topped cabinet knobs.

IMG_1311

With a Power Tab, attach the knob base to the middle of the upturned glass.

IMG_1312

With another Power Tab, add the plastic bead. There will be exposed adhesive around the base of the bead, just enough to add a small piece of beaded trim for extra decoration.

IMG_1314

That’s it! How easy is that! Your Mini Cloches are finished! Yes, they are strong enough to pick up by the knob if you are using the cheap dollar store glasses – you may want to use two Power Tabs for heavier cut crystal! After the presentation, simply pull off the knobs (tug hard) and fill with wine! Cheers!


Sweet Treats Hop with Tombow and Avery Elle February 14, 2014

“Rose are Red. Violets are blue. Sugar is sweet and this hop is too! We hope you are ready for some Lovely Ideas and Great Prizes this week from Tombow and Avery Elle. This Sweet Treats Hop is the perfect way to celebrate Valentine’s Day!! If you’re here from Maska Vanacker’s Blog, then you’re in the right place,  if not then you may want to start at the beginning.
Comment on all the Designers’ projects for your chance to win prizes you are guaranteed to fall in love with! One lucky winner will get BOTH a $50 Gift certificate from Avery Elle and $50 worth of Tombow Adhesive! IMG_3383I was inspired by Avery Elle’s Stamps and decided to create this cute container to hold those yummy French Macarons. IMG_3388 IMG_3387Start by gathering your materials. From Avery Elle we have the Bonjour Clear Stamp Set, and the matching Bonjour Die. I also used some pink butcher twine and mini pompom trim. From Tombow I used Two Pink Dual Brush Pens, Foam Tabs, Power Tabs, Mono Multi Liquid Glue and the new Xtreme Adhesive. IMG_3386Here are the sizes of paper to make a container that fits 4 macarons perfectly! One 6.5″ x 4″ for the container (to make a container to fit more macarons, add 1″ for each additional cookie!) Two 1.5″ x 7″ (score in half and cut slits) and four 2″ circles for the bottom and lid pieces. A rosette cut from coordinating decorative paper is also used to decorate the lid. IMG_3389Using Avery Elle’s Bonjour Set, stamp, color the motifs using the Dual Brush Pens, and then cut out using the Bonjour Die. IMG_3390Use the Xtreme Adhesive to form the cylinder and the two ends. Xtreme is super strong and holds heavier paper together beautifully! With the Xtreme, make sure to swipe to the side  before lifting for perfect cuts! The rosette was created using a rosette die, Mono Multi Liquid Glue and two Power Tabs. I also used the Multi Glue to add glitter around the edge of the rosette.IMG_3385To add the pompom trim, apply the Mono Multi Liquid Glue, let it dry clear and sticky, and then add the trim for a super hold with no mess! Use Power Tabs and Foam Tabs to add your embellishments and finish your container! bloghop_averyelleTo be eligible to win, please comment on each of the designers projects  and don’t forget to “Like” the Avery Elle Facebook Page and “Like” the Tombow Facebook Page. If you don’t have  Facebook, still comment on the projects and Tombow will select someone to win a prize just for playing!


Debbie’s Pink Challenge October 17, 2013

IMG_2007

Here is my post for Debbie’s Pink Challenge! Debbie is a member of our Tombow Design team and you can follow her blog here.  I created a pink card using Dot Adhesive Stamp Runner to adhere the panels and Power Tabs to attach the paper flowers and silk ribbon bow. Mono Multi Liquid Glue was used to add rhinestone centers to the flowers.

Debbie_pinkStamp Runner Dot Pattern Adhesive

Mono Adhesive Dots

Dual Brush Pen 703

Dual Brush Pen 725

Dual Brush Pen 761

Irojiten Color Pencil Cameo Pink

Irojiten Color Pencil Rose Pink

Irojiten Color Pencil Plastic Pink

Look at all the wonderful pink Tombow Products you can win by playing along and creating something pink!

Go to Tombow’s Blog for Contest details!  Entries are due by October 2oth at noon EST. Voting Begins October 21st and ends October 22nd at 3:30 EST. We will announce the Winner via our Facebook Page. Good Luck!


Chickadee Card March 22, 2013

Tombow bloghop

Hello Hoppers!

Welcome to the DCWV/Tombow Spring Fling Blog hop.

This week, DCWV and Tombow have teamed up to spread a little bit of spring fever. Both design teams are excited to show you just what we have done with the My Sunshine and Chickadee stacks from DCWV, and some amazing adhesive products from Tombow.

IMG_0621

This darling card was created using cardstock from the DCWV Chickadee Stack, Tombow’s Dual Brush Pens and Tombow Adhesives. I also colored chickadee peel-offs from Elizabeth Craft Design and added a silk bow from May Arts.

IMG_0617

What struck me the most with this beautiful double-sided cardstock was the wonderful color combination! I choose the following Dual Brush Pens to match the papers: N79 Warm Gray 2, 772 Blush, 755 Rubine Red, 993 Chrome Orange, 912 Pale Cherry, 312 Holly Green, 249 Hunter Green, and the colorless blender N00

IMG_0618

I used the indirect blending method by adding the Dual Brush Pen colors to the new blending palette and picking up and coloring with the colorless blender.

IMG_0619

To create the ruffled edge, I cut a second scalloped edge from the stack and applied MONO Multi Liquid Glue to the top of the strip, and Foam Tabs to the bottom.

IMG_0621

This detail shows the finished ruffle bottom. I also used this technique to attach the wing to the chickadee. The panels are attached using the Dot Stamp Runner Adhesive and the bow with a Power Tab. The great dimension in this card was created using the small and large-sized Foam Tabs. You can also stack the Foam Tabs for extra high dimension!

IMG_0631

Here are two more cards using the same techniques to show off the beautiful papers of this DCWV stack!

IMG_0620

VWP_0507signature-234

Be sure to visit all the projects featured this week and leave a comment for your chance to win!  One amazing package of Tombow Adhesive including NEW Stamp Runner Permanent Adhesive, NEW Stamp Runner, Dot Pattern Adhesive,  MONO Multi Liquid Glue, and MONO Glue Stick to one other lucky reader! DCWV will be giving away both the My Sunshine and Chickadee stacks to 2 lucky readers. The more you comment, the more chances you have to win!

Blog Hop_DCWV

Now, head on over to Karla’s Blog to see what kind of spring craftiness she has created!

If you enjoyed this post please follow us on


Sticky Note Package February 3, 2013

It’s not too late to make some gifts for friends and co-worker this season! This paper package holds a pad of sticky notes and would be a welcomed gift for any office worker or busy mom. Check out Tombow’s Fine Pens , they would be a welcomed companion gift to the package! Tombow adhesives makes it fast and easy to make and insures it will hold together. Change it up by using papers and embellishments to match your recipient’s style.

I used paper and embellishments from the Art Angel collection from Cosmo Cricket.

I used the Mono Multi liquid Glue for the box and cover construction and added the panels using the Dot Adhesive. The belly band holds the container closed and also works as an easel to hold the lid up when using the sticky notes. The Fastener Tabs makes both these functions possible!

The decorative chip boards decorates the inside lid and a Power Tab is used to hold a button embellishment to the belly band. I’m showing the package here with both an open and closed view. My favorite Tombow pen, the Zoom 727 Ballpoint Pen, is also shown.

Want to see complete instructions for this project? Go to Scrapbooking.com for the dimensions and step-by-step instructions!