Marie Browning

"Inspiring and honoring creativity"

Debbie’s Dollar Store Challenge November 3, 2014

Filed under: Uncategorized — mariebrowning @ 10:49 am
Tags: , ,

IMG_1310

What a great challenge Debbie! I’m going to show you how to make Mini Cupcake Cloches using Tombow’s Power Tabs! This idea is great for a presentation of mini cupcakes or handmade goodies for a tasty gift – with the best part you are really giving them a set of stemless wine glasses! I picked up some clear glasses, plastic beads and beaded trim at the dollar store. You will also need some cabinet knob bases or flat-topped cabinet knobs.

IMG_1311

With a Power Tab, attach the knob base to the middle of the upturned glass.

IMG_1312

With another Power Tab, add the plastic bead. There will be exposed adhesive around the base of the bead, just enough to add a small piece of beaded trim for extra decoration.

IMG_1314

That’s it! How easy is that! Your Mini Cloches are finished! Yes, they are strong enough to pick up by the knob if you are using the cheap dollar store glasses – you may want to use two Power Tabs for heavier cut crystal! After the presentation, simply pull off the knobs (tug hard) and fill with wine! Cheers!


Blog Hop with the Frugal Crafter! October 24, 2014

IMG_1277

This week we are blog hopping with guest designer Lindsay Weirich, also known as the Frugal Crafter! I have a new DoodleDab for you, “Willow in the Wind” done in Autumn hues to accent a card. If you just came from Jennie Garcia’s blog you are on the right track. If not, you may want to start at the beginning here at the Tombow Blog so you are eligible to win the prize!

IMG_2538

IMG_1278

Here are the step outs for the DoodleDab. Remember to turn the paper so it’s easy to place the teardrop strokes. For the accent on the card I used the colors from the Dual Brush Pen Set, Muted Colors. 

IMG_1279

I added color to the photograph using a few matching colors of Irojiten Colored Pencils.

IMG_1281

The panels were attached using the Xtreme Adhesive and the photo panel popped up with Foam Tabs. I used my Envelope Punch Board to create a matching envelope. The Xtreme Adhesive is  perfect for constructing the envelope instantly and securely! Don’t forget to add more DoodleDabs to decorate the panel on the envelope!

Bloghop_FC

In order to be qualified to win this amazing prize, a Dual Brush Pen Set, Muted Colors, please comment on each of the designer’s projects. We will announce a winner Monday Oct. 27.

Your next stop is Lindsay’s blog, our guest this week to see what wonderful creation she has for you!


Blog Hop with Pretty Papers Pretty Ribbons May 24, 2014

Filed under: Uncategorized — mariebrowning @ 1:00 am

FacebookBannerThe design teams from Tombow and Pretty Papers Pretty Ribbons have joined together to bring you lots of inspiration! Make sure to follow the blogs to be able to win a prize! Did you come here from Leanne’s blog? Then you are on the right track! If not, you may want to start at the beginning at Lisa’s blog! Do you know a superhero? Check out these cards designed for end-of-year teacher greetings!

IMG_3664IMG_3663

I loved making these cards! The Superhero Images from Pretty Papers Pretty Ribbons were fantastic and tons of fun to manipulate and print out, and Tombow adhesives perfect for putting everything together. I’m a newbie to digital images and found out how easy it was! I did learn the importance of using good bright white paper to print out, it sure makes a difference. This first card shows Wonder Woman on Spring Fling Chevron paper. The Dots Adhesive was used to attach the panels to the card, and Foam Tabs to make the ‘Thanks for the Great Year’ panel dimensional. I also added Aqua Liquid Glue using the fine point dispenser around the ‘Kaboom!’ and sprinkled with glitter.

IMG_0193IMG_3665IMG_0192After printing the image out, I used an Irojiten Colored Pencil to add a blue shadow around the words and the hero figure to help them ‘pop’ off the background print.

IMG_3661IMG_0198IMG_3662

The second card used images from the Superhero Collection and the Spring Fling Chevron paper. Layering the images before printing was easy, but I also printed elements, such as the ‘Zap!’ and ‘Bam!’ separately so I could cut them out and adhere with the Foam Tabs for great dimension. Because the card was for a teacher I found a great Batman quote to add to the inside panel. For this card I also used the Dots Adhesive, which was perfect for adding adhesive to the detailed cut out images. Did I mention Pretty Papers Pretty Ribbons also has cutting files for all their graphics? Sweet!

bloghop_PPPR

For a chance to win this awesome prize, you must be a follower of each blog and leave a comment on each blog. For extra chances you can also ‘Like’ Pretty Papers Pretty Ribbons and Tombow Facebook pages.

Next go to Melisa’s blog and see what inspiring project she has created for you!


Jennie’s “April Showers” Challenge by Marie Browning April 1, 2014

Filed under: Uncategorized — mariebrowning @ 6:55 am

Great theme Jennie! I have LOTS of experience with rain! Living in a rainforest on the west coast makes me an expert! You would think I would get tired of dark and wet days but I actually love the rain!

IMG_3480

IMG_3477

I made my rain inspired piece on a page in my journal. I started with covering the blending palette with Dual Brush Pen colors. I used N60 Cool Gray 6, N55 Cool Grey 7 and 533 Peacock Blue. Then I sprayed the palette using the mister and then turned it over onto my page to create a splashed base.

IMG_3478

While it was still a bit damp, I made the raindrops by pushing down the brush tip of the N60 pen onto the paper. I made more raindrops when the colored splash had dried as well.

IMG_3479

I then drew a Zentangle Inspired flower onto the page and added the Dr. Seuss quote from the “the Cat in the Hat”; “The sun did not shine. It was too cold to play. So we sat in the house. All that cold, cold, wet day.” This rainy background would also be great on a scrapbook page or a background for a stamped card.

Jennie_Aprilshowers

To play along, you have until Monday, April 7th at Midnight to participate. Voting starts Tuesday April 8th so make sure to tell all your friends to vote! The winner will be announced Wednesday April 9th. You could win Tombow’s Mono Multi Liquid Glue, Removable Adhesive, Dots Adhesive and the new Xtreme Adhesive.

Have fun and Good Luck!

VWP_0507signature-234


Mellisa’s Spring Bling Challenge – Bath Salt Sachets March 10, 2014

Filed under: Uncategorized — mariebrowning @ 6:00 am
Tags: , , ,

IMG_3437

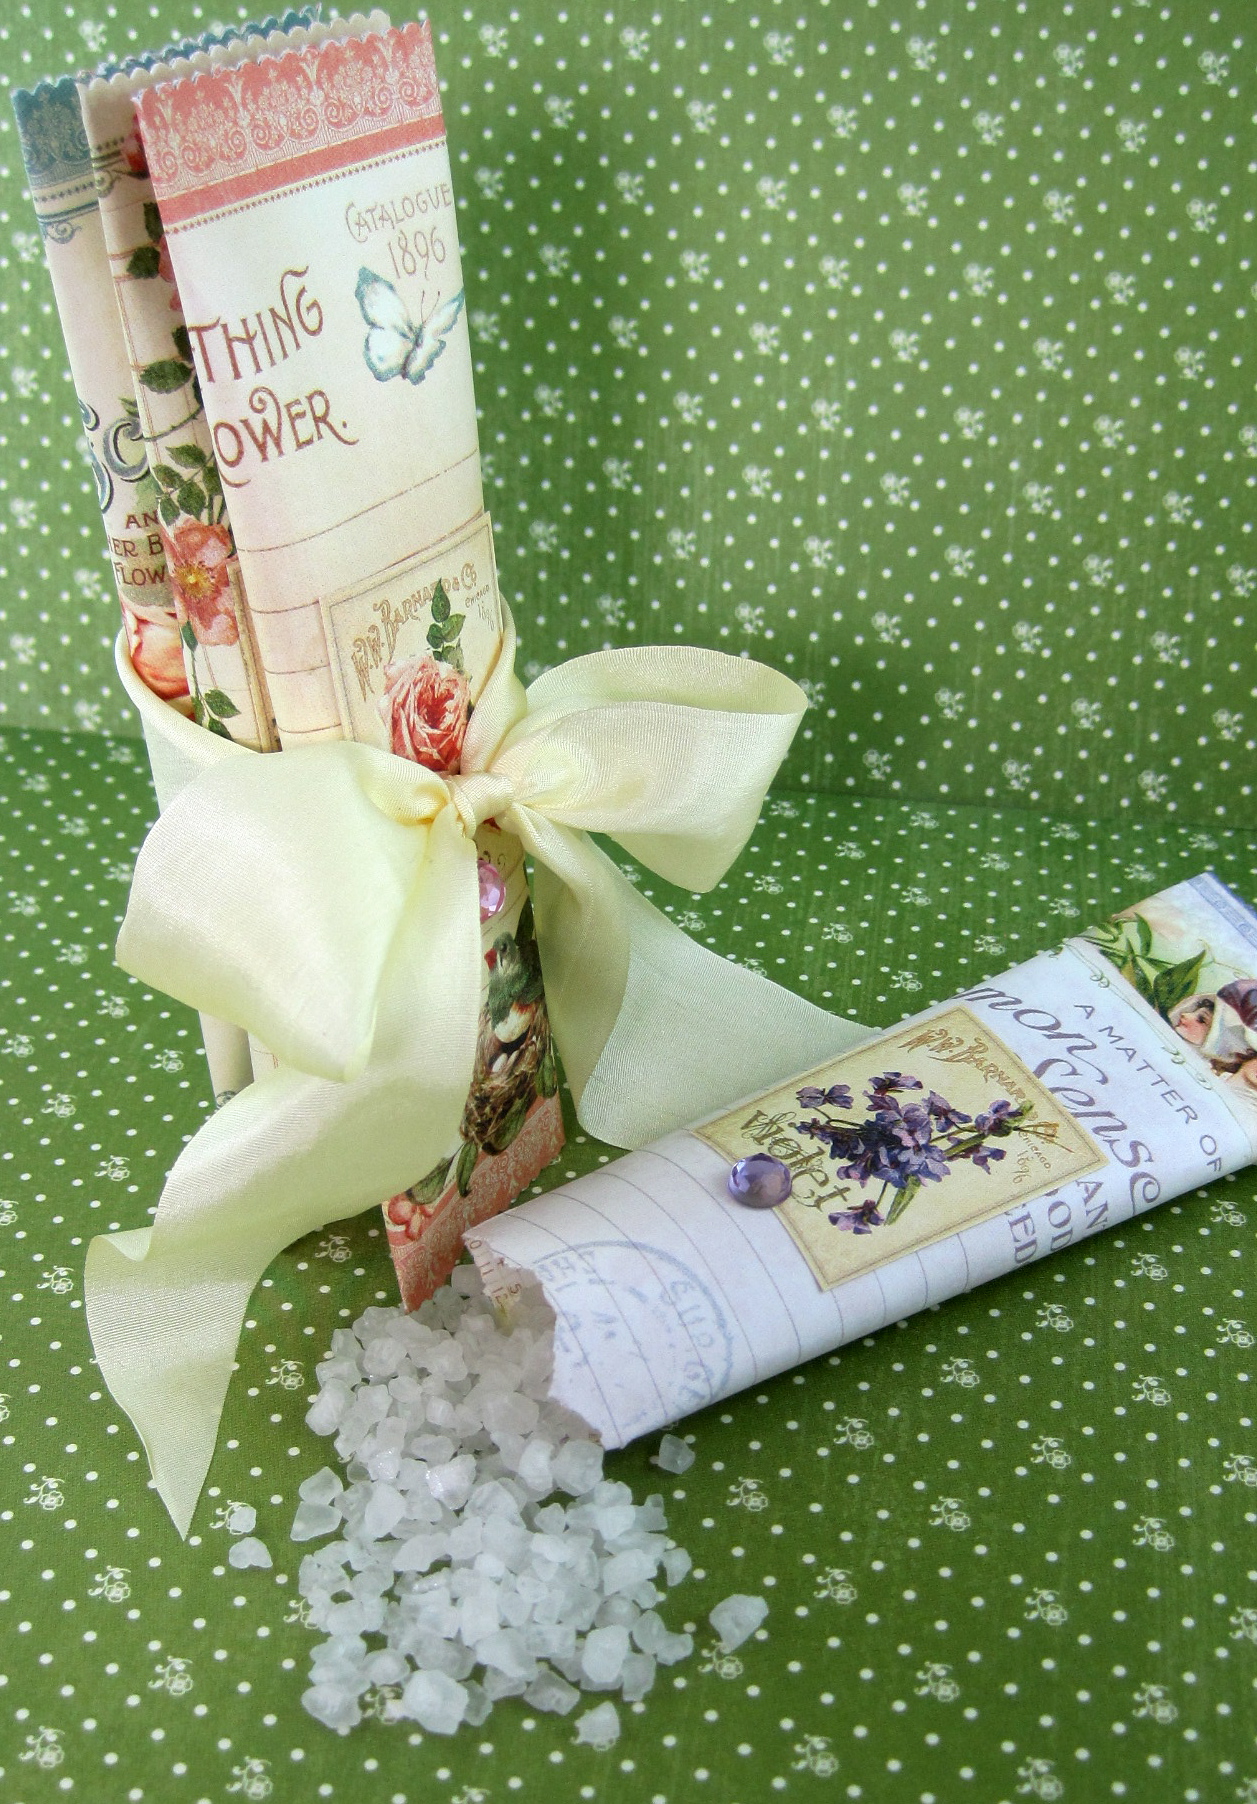
Mellisa’s challenge is “Spring Bling”, so I decided to use some beautiful Secret Garden cardstock from Graphic 45 and create some individual-use packages of fragrant bath salts! Mainly because my spring is still a little damp and cold and comfy, fragrant warm baths are still on my mind these days! Not only are these sachets a breeze to make, but very economical.

IMG_3439

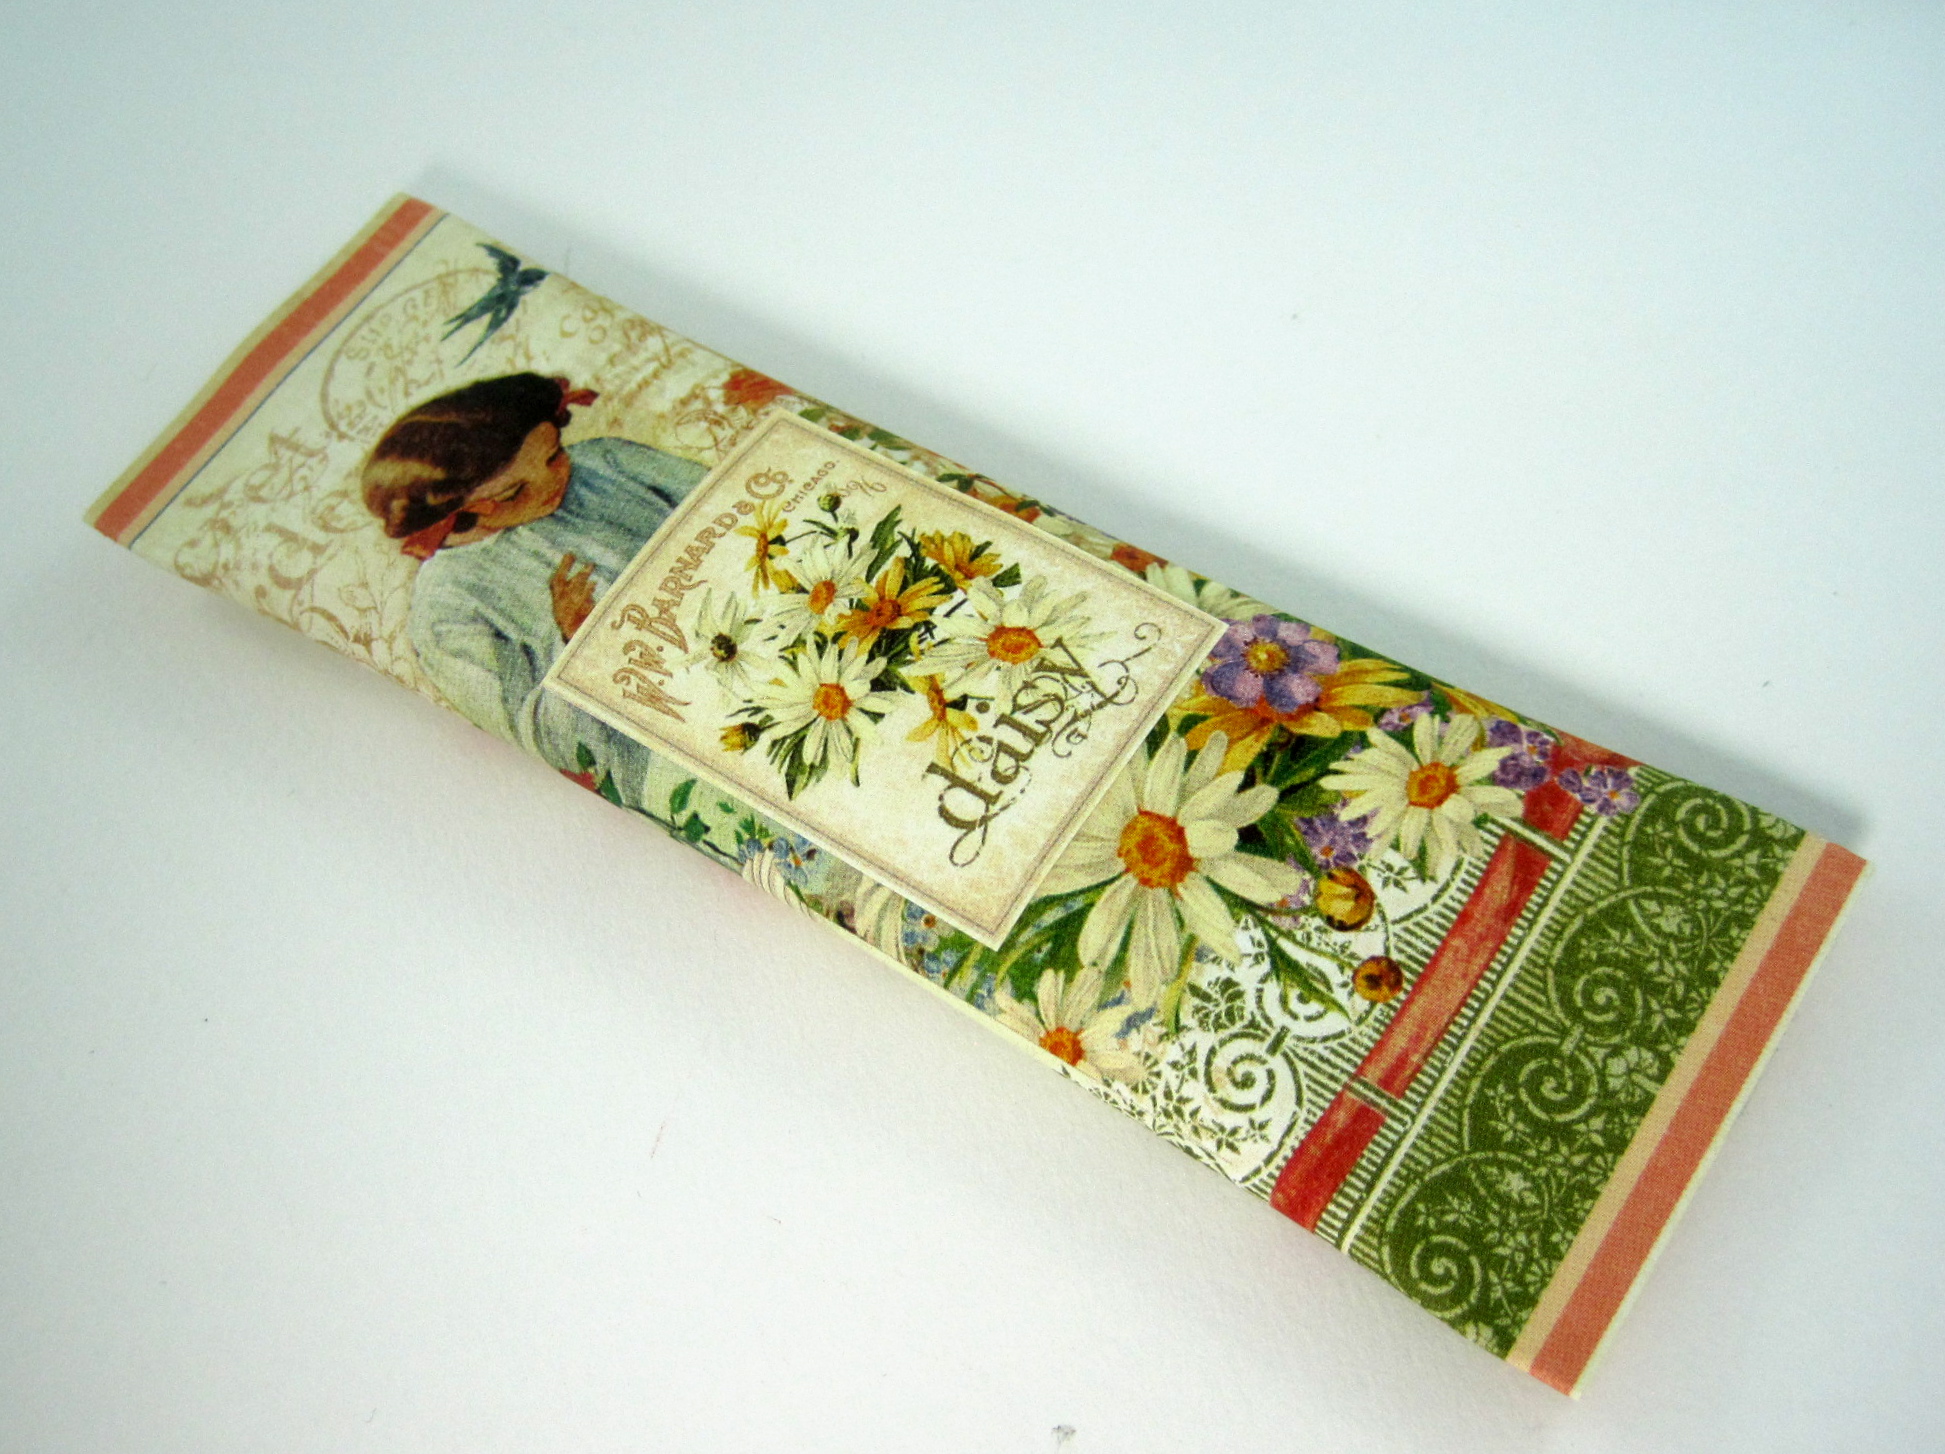
Cut the May Flowers cardstock into 4” x 6” panels. You can make 6 sachets from one sheet of 12 x 12 cardstock! Cut out the Seed Fairy 1.25” x 2” labels.
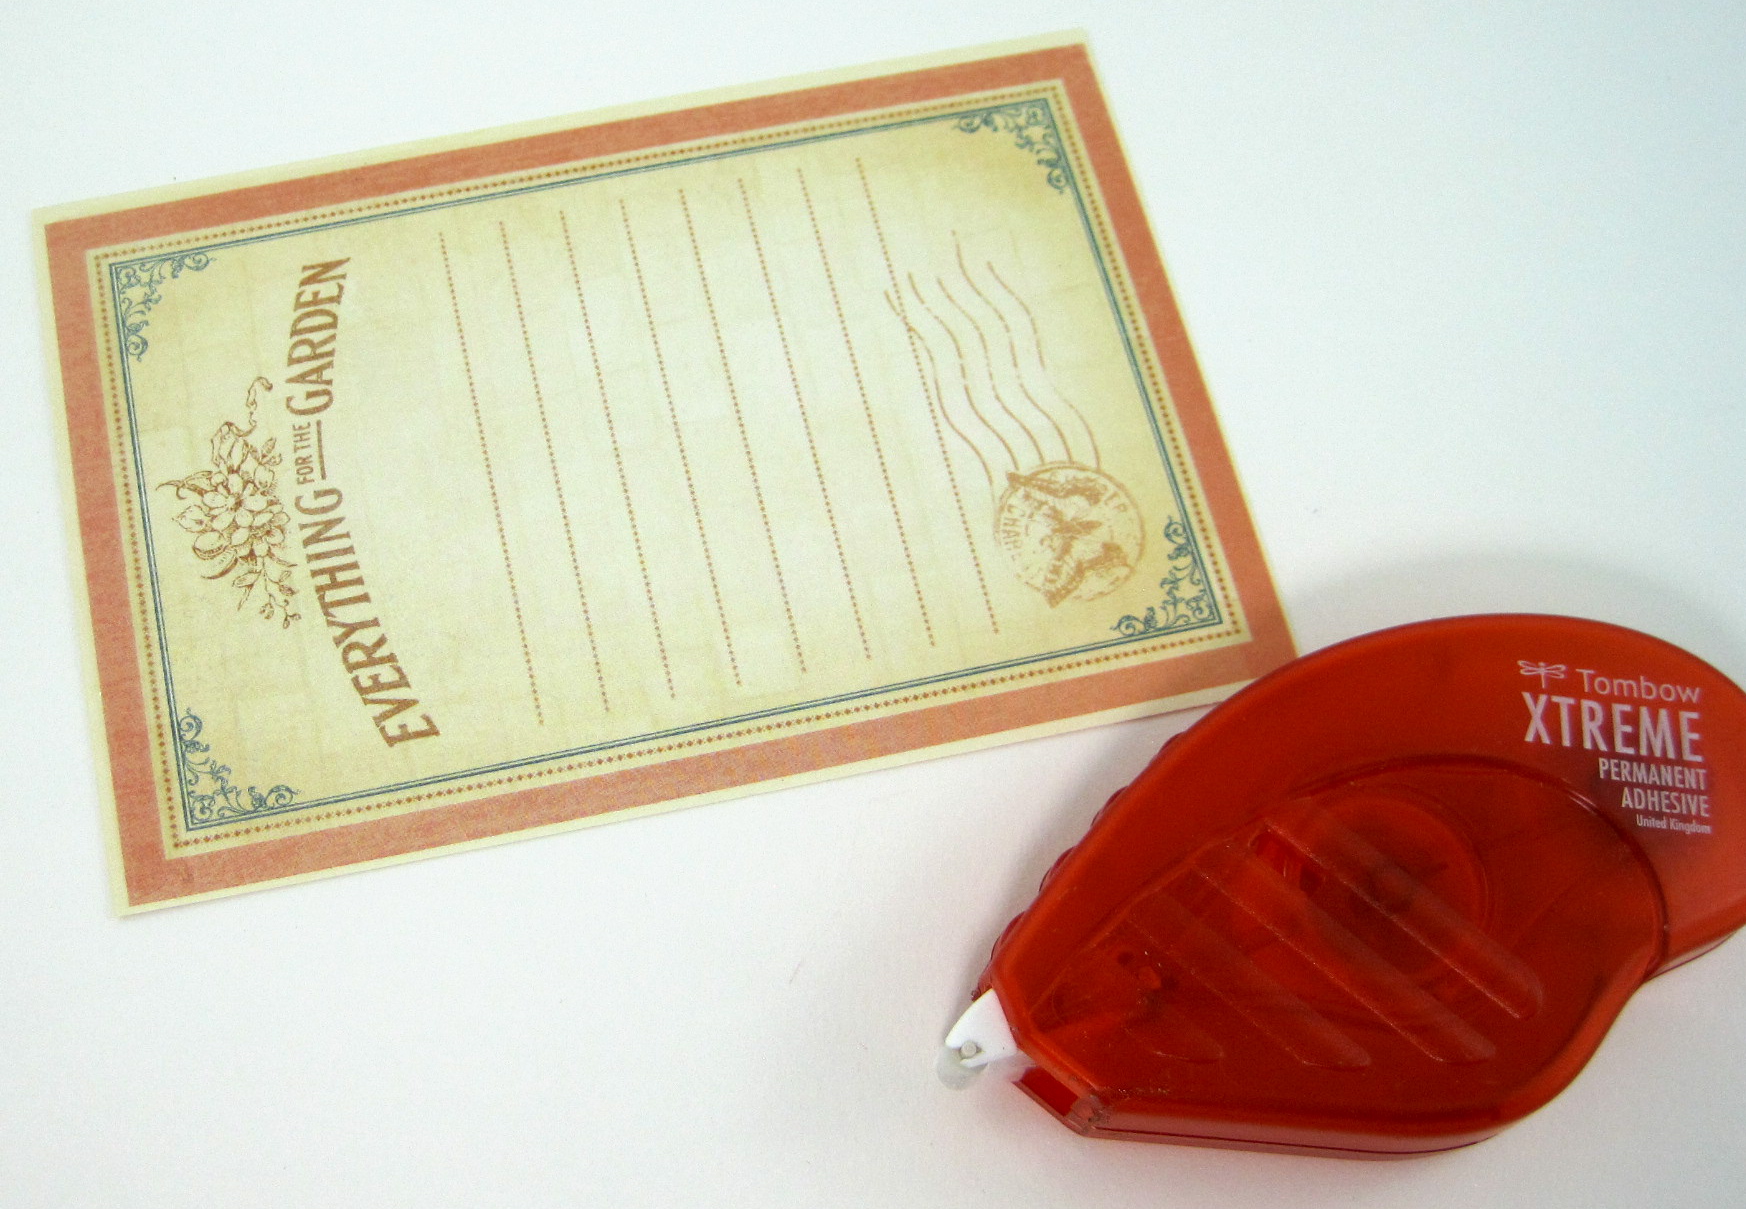
Apply the Xtreme Adhesive to the long top and the two short sides of the large panel.

IMG_3440

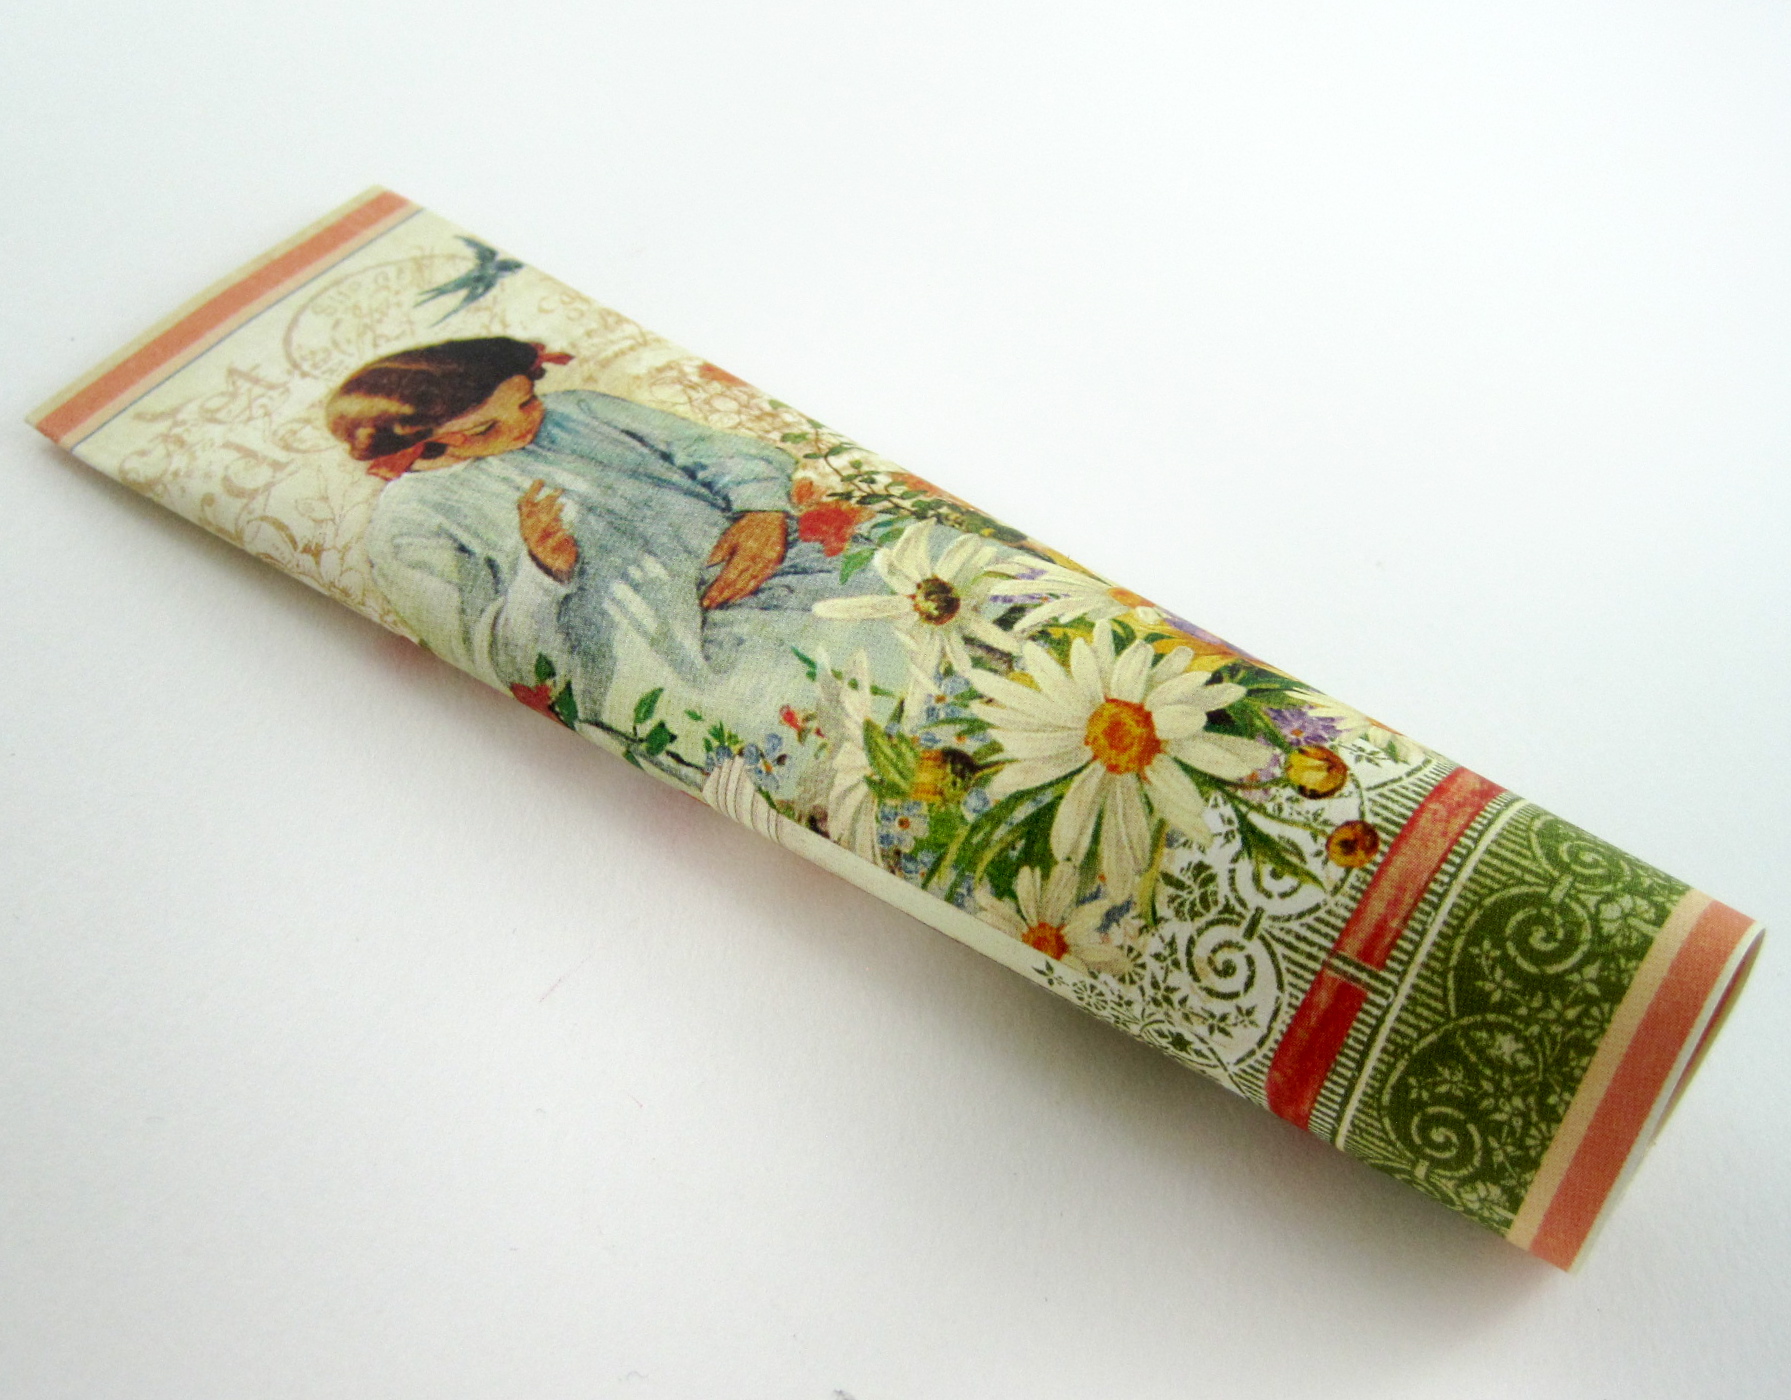
Roll and adhere the paper panel into a long cylinder. The Xtreme is excellent for creating the sachets, it’s an instant strong bond that will not allow any salts from leaking out!

IMG_3441

Pinch the bottom closed and then fill the tube with 1/4 cup bath salts. Use a paper funnel so you don’t get any of the salts stuck to the adhesive.

IMG_3445

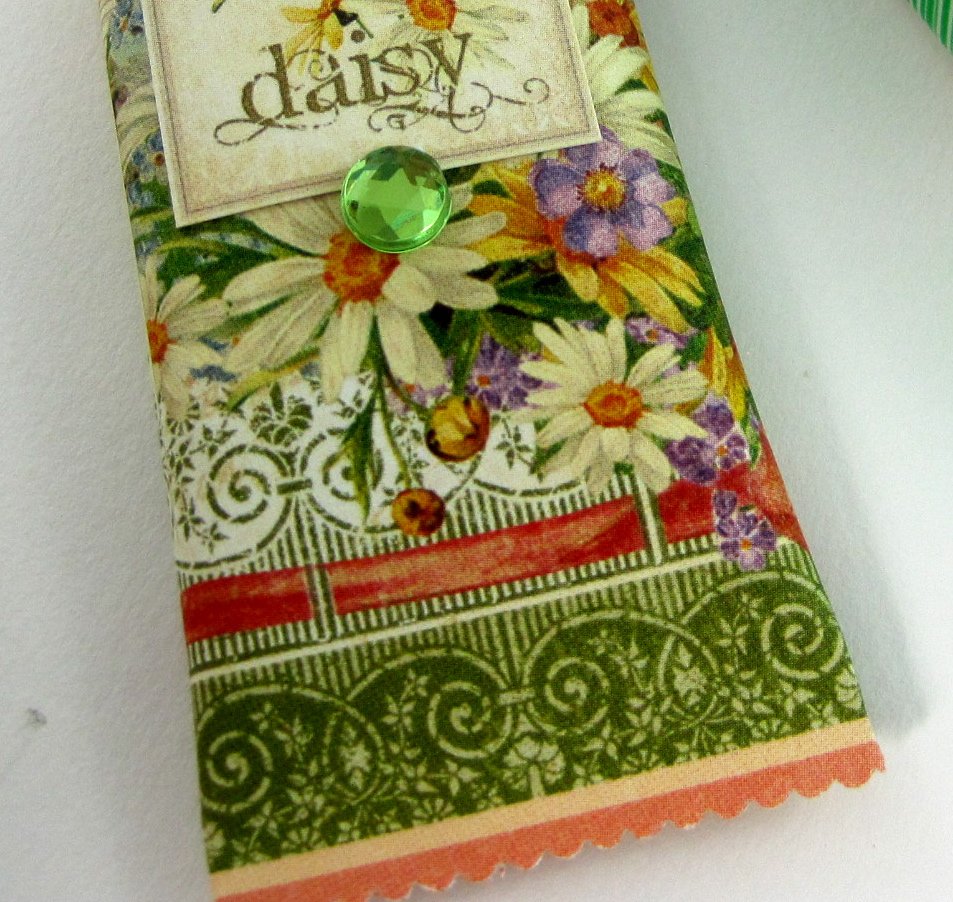
 Pinch the opposite side to close your package. Add the “Seed Fairy” label using the Xtreme.

IMG_3447

Use decorative scissors to trim the ends and a drop of Multi glue to attach a rhinestone for the bling!

IMG_3448

You can use bath salts from the store, or make your own! here’s how:

Bath Salts
1 cup Coarse Sea Salt
1 cup Epsom Salts
1 Tablespoon Liquid Glycerin
30 drops Fragrance oil
Measure and place the salts in a glass jar. Add the liquid glycerin, and fragrance oil to the jar. Place the lid on the jar and shake until all the salts are coated evenly with the glycerine and fragrance.
Here are some nice fragrance blends to match the project labels!
Daisy Fresh: 10 drops each lime, lemon and lavender
Effervescent Floral: 10 drops each Jasmine, Lavender and Violet
Luscious Lily: 10 drops each Lemongrass, Orange and Lavender
Rose Dream: 15 drops each rose and vanilla

IMG_3453

Bath Time!
Draw a warm bath and add one package of the fragrant salts to the running water. Hop in and relax, inhaling deeply to experience the soothing aromas and wait for spring!

Play along by adding your Spring Bling Project at Tombow’s blog  for a chance to win!

Melissa_SpringBling


Sweet Treats Hop with Tombow and Avery Elle February 14, 2014

“Rose are Red. Violets are blue. Sugar is sweet and this hop is too! We hope you are ready for some Lovely Ideas and Great Prizes this week from Tombow and Avery Elle. This Sweet Treats Hop is the perfect way to celebrate Valentine’s Day!! If you’re here from Maska Vanacker’s Blog, then you’re in the right place,  if not then you may want to start at the beginning.
Comment on all the Designers’ projects for your chance to win prizes you are guaranteed to fall in love with! One lucky winner will get BOTH a $50 Gift certificate from Avery Elle and $50 worth of Tombow Adhesive! IMG_3383I was inspired by Avery Elle’s Stamps and decided to create this cute container to hold those yummy French Macarons. IMG_3388 IMG_3387Start by gathering your materials. From Avery Elle we have the Bonjour Clear Stamp Set, and the matching Bonjour Die. I also used some pink butcher twine and mini pompom trim. From Tombow I used Two Pink Dual Brush Pens, Foam Tabs, Power Tabs, Mono Multi Liquid Glue and the new Xtreme Adhesive. IMG_3386Here are the sizes of paper to make a container that fits 4 macarons perfectly! One 6.5″ x 4″ for the container (to make a container to fit more macarons, add 1″ for each additional cookie!) Two 1.5″ x 7″ (score in half and cut slits) and four 2″ circles for the bottom and lid pieces. A rosette cut from coordinating decorative paper is also used to decorate the lid. IMG_3389Using Avery Elle’s Bonjour Set, stamp, color the motifs using the Dual Brush Pens, and then cut out using the Bonjour Die. IMG_3390Use the Xtreme Adhesive to form the cylinder and the two ends. Xtreme is super strong and holds heavier paper together beautifully! With the Xtreme, make sure to swipe to the side  before lifting for perfect cuts! The rosette was created using a rosette die, Mono Multi Liquid Glue and two Power Tabs. I also used the Multi Glue to add glitter around the edge of the rosette.IMG_3385To add the pompom trim, apply the Mono Multi Liquid Glue, let it dry clear and sticky, and then add the trim for a super hold with no mess! Use Power Tabs and Foam Tabs to add your embellishments and finish your container! bloghop_averyelleTo be eligible to win, please comment on each of the designers projects  and don’t forget to “Like” the Avery Elle Facebook Page and “Like” the Tombow Facebook Page. If you don’t have  Facebook, still comment on the projects and Tombow will select someone to win a prize just for playing!


Blog Hop with Hilary Kanwischer October 7, 2013

The fabulous Tombow Design Team is blog hopping this week with talented guest designer Hilary Kanwischer . If you just came from Jennie’s blog you are on the right track! If not, and you want a chance to win a prize, go back to Tombow’s Blog and follow the projects!

IMG_1959

Isn’t this a great background? It was done with the blending palette, mister and green Dual Brush Pens using the splash technique. I then did a direct-to-stamp inking with blue hued Dual Brush Pens onto a cracked background stamp. The secret? It was done on glossy photo paper! (Thanks Rick for the idea!) If you want to learn more about this and many other techniques using the Dual Brush Pens, check out my new class Viva la Vivid Cards at My Creative Classroom.

IMG_1933This is the card I made with the background. The lizard was done in the same manner, direct-to-stamp coloring, misted and then stamped on glossy photo paper. Looks even better in real life! The dark blue cardstock panel was adhered to the background with the Permanent Adhesive Stamp Runner, the perfect adhesive for an excellent bond to glossy paper! The lizard panel was then popped up with Foam Tabs and paper leaves glued in with Mono Multi Liquid Glue.

Blog Hop_HKNow remember to comment to be able to win a Permanent Adhesive Stamp Runner and Refill! Now go to our guest designer, Hilary Kanwischer,  to see what gorgeous project she has created!


Halloween Popcorn Box Blog Hop September 30, 2013

PopcornBlogHopPrize

Welcome to Laura Kelly’s wonderful Halloween Popcorn Box Blog Hop! You will see lots of inspirational designs and have a chance to win a $100 Disney Gift Card!

IMG_1911

I decided to create a gift container for a Halloween party. I covered the popcorn box with spooky spiderweb cardstock using Tombow’s Aqua Liquid Glue; my favorite go-to glue for laminating paper together! I added a cute button spider made with colored wire and buttons from Laura Kelly Buttons from Buttons Galore and attached him crawling out of the top with a Tombow Power Tab. The decorative paper tag and paper strip at the bottom of the box are cardstock from Graphic 45’s ‘Place in Time’ Collection and attached using Tombow’s Dot Adhesive.

The box is then filled with a set of pumpkin carving tools from the dollar store, Tombow Dual Brush Pens in Halloween colors and a set of Halloween stamped cards. Perfect items for activities at the party! I would have added candies as well, but then I would have had to eat them so substituted pumpkin lights to embellish! Muw-ha-ha-ha! My evil genius foiled the calorie gremlins once again!

Make sure to check out cre8time.org – a wonderful social site filled with projects to experience the joy of crafting!

Here’s to a happy, spooky and crafty Halloween!


Blog Hop with Stacy Julian September 16, 2013

This week I am blog hopping with the talented Stacy Julian and the fabulous Tombow design team! If you just came from Jennie’s blog you are on the right track!

IMG_1845This week I travel to Mall of America in Minneapolis for ScrapFest! I will be teach two different card classes; here’s a card from the Holiday Card class that uses cardstock from Fancy Pants Etcetera Collection.

IMG_1832We start by learning how to draw a snowman and then add the doodles. We then jazz them up with brilliant color using Irojiten Colored PencilsRetro Dual Brush Pen set and Blending Kit.

IMG_1827I like to use a light blue Irojiten Pencil for shading the snowman, a nice soft effect and easier for beginners to shade.

IMG_1828I then use the brush tip of the Dual Brush Pens to color in the accessories. The snowman gets a light blue ‘halo’, and then cut out and attached to the card using Foam Tabs.

Blog Hop_SJNext go to Stacy’s Blog and see what she has created for you using Tombow products! Be sure to like both Tombow USA and Stacy Julian on Facebook! Then comment on the posting to win a new Blending Kit, Retro Dual Brush Pen Set and Irojiten Color Dictionary Pencils Volume 2.


Blog Hop with Tifany DeGough September 9, 2013

This week I am blog hopping with the amazing Tifany DeGough and the fabulous Tombow design team! If you just came from Jennie’s blog you are on the right track!

IMG_1769Here are some sneak peeks into my video projects I did featuring Tombow products for JoAnn’s in Akron, Ohio recently. We taped a series of six videos and when they are edited and uploaded I will share them with you! The production staff were a great group to work with!  I also received a very warm welcome from shuttle drivers, hotel staff and generally everyone I met in Ohio.  This photo shows a sparkly snowflake ornament that used Mono Multi Liquid Glue, Mono Aqua liquid glue, Foam Tabs and Power Tabs.

IMG_1745These pleated rosettes adorn a Vintage Bulletin Board and used Mono Multi Liquid Glue, Removable Adhesive and Power Tabs to create.

IMG_1752These brightly colored and template free containers are also created with Mono Multi Liquid Glue along with Dot Adhesive Stamp Runner and Power Tabs. These projects, complete with instructions, will be online soon! Make sure you follow JoAnn Store’s Facebook Page and me for these and many other creative projects!

Blog Hop_TGMake sure to comment on all the posts this week and win this great prize from Tombow! You could be the happy winner of Tombow’s Power Tabs, Mono Multi Liquid Glue and Dot Adhesive Stamp Runner! Now go to Tifany’s Blog to see what wonderful project she has created for you!

If you enjoyed this post please follow me on:

Facebook facebo

Twitter
twitter