Marie Browning

"Inspiring and honoring creativity"

Winter Wonderland Blog Hop with Tombow & Stampendous! November 23, 2014

Filed under: Cards,Irojiten Color Pencils — mariebrowning @ 3:00 am
Tags: , ,

Welcome to the Tombow and Stampendous Winter Wonderland Blog Hop! If you just came from Janelle’s blog, you are on the right track! If not, you may want to start here at the Stampendous Blog so you are entered to win a prize! This is a three day blog-hop that started on Friday.

IMG_1367

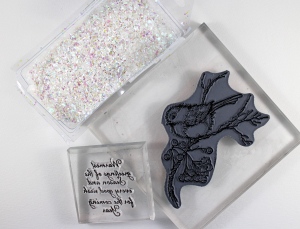
For this project, I choose two stamps from Stampendous; ‘Snow Bird’ and ‘Tis the Season’. I’m also trying out Stampendous’  new ‘Spoonful of Snow’ which is a mixture of embossing powders and elements.

IMG_1368

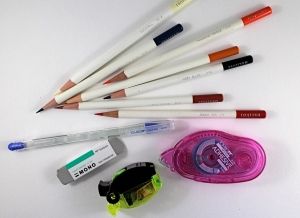
From Tombow I used Irojiten Colored Pencils, Color Pencil Eraser, Ippo Sharpener, Glue Pen and Dots Adhesive.

IMG_1373

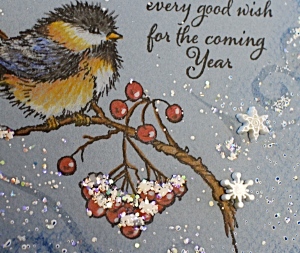
I stamped the Snow Bird onto blue pastel paper with a black ink pad. I then used the Irojiten Colored Pencils to color the bird. The colors blend and layer beautifully, and you get that added bonus of having them work so nicely on colored paper.

IMG_1372

I then used the ‘Spoonful of Snow’ to add the snow. I am really excited about this product, pure genius! Watch this video on how to use it! The Glue Pen was used on the snow on the berries and branches to keep the snow to stay in place, and the rest was sprinkled over the panel. I used a dry, clean brush to remove any bits where I didn’t want it and then embossed from the bottom with my heat tool. The results were spectacular!

IMG_1371

Here is the completed card. I also added a few plastic snowflakes on with the glue pen. The edging was done with a VersaMark stamp pad and dark blue chalk. I really liked how nicely the snow and Irojiten colors look on the blue colored panel!

IMG_1374

Here’s my attempt to show you how sparkly the card is! It’s very sparkly!

Stampendous_hop_prize

In order to be entered to win this amazing prize, Tombow Dual Brush Pens, 10 set Bright and Stampendous! Jumbo Cling Rubber Top Hat Snowman, please comment on all the design team’s projects as well as LIKE both TombowUSA and Stampendous! on facebook! We will be anouncing the winner on Monday, Nov. 24 at 3:30 pm est.

Your next stop is Asia King’s blog to see what she has created for you!
 

Glue Pen Magic by Marie Browning June 17, 2013

IMG_1268

Welcome to this week’s Tombow Blog hop with guest designer Trixi Hulm!

Here’s some magic you can do with Tombow’s Glue Pen and the Dual Brush Markers. I started with a piece of smooth, 90lb watercolor paper from Canson and used the glue pen to draw a simple flower. Because you are drawing with a clear pen onto white paper, make sure you have good, direct overhead lighting, and you need to hold your head just right to be able to see the wet glue on the paper! Let the glue dry a few minutes and then cover the paper with color using the splash technique. Splash technique? Simply cover the blending palette with Dual Brush Pen color, mist on water and then place the paper right side down into the diluted color. Lift up and let dry for an interesting watercolor background. The Glue Pen resists the color and you have a white lined drawing! No need to remove the glue!

IMG_1272

Next use your Dual Brush Pens to add color into the details, you can add it directly onto the paper or use the indirect blending method.

IMG_1279
You can also add color around the image as I did here with a green hue. The most important thing to remember is to have fun!

IMG_1278

IMG_1276

Here are some additional images using the same Glue Pen resist technique. Oh yea, the glue pen is also awesome to adhere rhinestones, glitter or other small embellishments onto your paper crafts!

bloghop_Trixie

If you follow all the blogs on the hop this week you can win this amazing package of Tombow products: MONO Removable Adhesive and MONO Permanent Adhesive with refills!

The more you comment, the more chances you have to win!
Now, head on over to Trixi’s Blog to see what kind of craftiness she is up to!

If you enjoyed this post please follow me on:

Facebook

facebo

Twitter

twitter


‘Impressive’ Zentangle Tiles March 1, 2013

I love the black tiles from the Zentangle folks – and my favorite method to tangle on them is with a unique impressed technique and Irojiten Colored Pencils!

Here are a few examples of the ‘impressed technique’ tiles. Create your Zentangle in the usual way, but instead of a white gel pen, use a black ball point pen or an embossing tool with a small ball end.

It’s easy to see the marks you make on the thick Fabrino paper that the Zentangle tiles are made from – just remember to press firmly to indent the paper.

When you have finished your tangles, it’s now ready to color. Choose a volume of Irojiten Color Pencils – I like the Pale Tone colors and the Fluorescent colors. Start by lightly coloring in your color fields and watch your lines magically appear. Layer the colors for interesting color blending. Keep applying the colors until you are happy with the intensity of the colors. You can press rather hard and those impressed lines will continue to stay black!

It’s a really fun and different way to create Zentangles. You can place your finished tile on a square card blank using MONO Multi Liquid Glue. I also like to add a little sparkle with fine glitter and the Tombow Glue Pen.

Happy Tangling in brilliant Irojiten colors!


Welcome 2013 December 31, 2012

Happy New Year!

This lettering was created using the Dual Brush Pens and Glue Pen. Want to see how easy it is to create fun lettering? I will be teaching an online Lettering class using the Tombow Pens starting January 24 at My Creative Classroom. Hope you can join me!

May every day of the New Year bring you joy, happiness and creative abundance!


Zentangle Wallet November 29, 2012

This week’s Tipnique is all about the wonderful new Fastener Tabs! They are fantastic for use as a closure on any object you want to open over and over again – like this paper wallet to show off your Zentangle tiles! What? You don’t know what a Zentangle is? Check out the official Zentangle site!

Here is the finished wallet shown closed. The wallet is made with 90 lb. watercolor paper for durability and to be able to tangle and color nicely. MONO Multi Liquid Glue was used to put it all together. I used Dual Brush Pens and a Glue Pen as a resist to color the tangles. Click here see a video of me demonstrating this color resist method.

Here is a close-up of the Fastener Tab. I have cut it in half before placing in on the wrap-around band. It is ultra thin – perfect when working with paper items such as cards and packages. The Tabs are long lasting and pre-paired so they are easy to use.

This view shows the inside of the wallet filled with 12 finished tiles. Use the wallet to share your tiles, or as a way to present them as a gift.

Tangle on! A word of warning: coloring your tangles is very addictive! Join me next week for another Tipnique using Power Tabs.


“Once Upon a Time…” October 17, 2012

I enjoyed this challenge; it reminded me of my love of Fairy Tales so I created my own little story booklet.

Some lucky little child will receive this and enjoy many hours of bedtime stories from their family! I love the new ‘Once upon a Springtime’ paper collection from Graphic 45 and wanted to do something extra special with it and this project is definitely the start of many…what’s your favorite Fairy Tale?

The pages are cut from the cardstock with my Bog Shot and the Accordion Album die. Using Stamp Runner Permanent Adhesive, I put the booklet together forming ten pages. I printed the story
from the Internet (lots of sites to find classic fairy tales!) onto cream colored cardstock, trimmed them and then adhered to the pages with the Permanent Adhesive. Being able to print your own tales also gives you the opportunity to personalize the characters with the names of the children who will receive the booklet.


Then came the fun of embellishing the pages! Tiny paper flowers, rhinestones, stamped images softly colored with Irojiten Colored Pencils and glitter makes the booklet extra special. The glitter wings of the fairies and rhinestones in crowns are added using the Glue Pen and larger embellishments added with the MONO Multi Liquid Glue, Foam Tabs and the stamping feature of the Permanent Adhesive Stamp Runner.
 
 The ribbon bellyband uses a Fastener Tab for a decorative touch that also holds the book together.
 
 
..and they all lived happily ever after….

If you enjoyed this post please follow us on http://www.facebook.com/tombowusa and http://twitter.com/#tombowusa


“Flocking” Tip-nique

Filed under: Tipnique,Uncategorized — mariebrowning @ 10:43 am
Tags: , , , ,

Flocking, or adding a soft, matte textured effect to paper, can be applied in ultra fine detail with
Tombow’s Glue Pen. I especially like it for adding fur on stamped animals!

For the sample I have used green flocking, a piece of printed cardstock and Tombow’s Glue Pen.
 
 
Apply the glue where you want the flocking. The glue is transparent so good overhead light and holding your head just right will allow you to see the glue. I do small areas at a time. However, the glue does not set up immediately and allows you do a decent sized area before drying.

Sprinkle on the flocking and let the glue set up for a few minutes before tapping off the excess.


Add more flocked areas until you are satisfied with the results. When completely dry, use a soft, clean brush to remove any excess flocking. The flocking gives a nice soft texture to the cards
that can be felt. Perfect for children’s cards, cards for sight-impaired recipients or for recreating soft, matte accents on vintage cards.
 
Sample of a monster image with flocked fur.
 
Enjoy your new Tip-nique, I’ll see you again next Monday with more fun projects.

If you enjoyed this post please follow us on http://www.facebook.com/tombowusa and http://twitter.com/#tombowusa


“Across the Universe…” August 20, 2012

A mixed-media zentangle inspired by the Universe!

I used some lyrics from the Beatles “Across the Universe” song and tangled around it with a permanent black pen. I then colored with the Dual Brush Pens in hues of blues and purples. The white centers in the top tangle were created by adding a dot with the Glue Pen and letting it dry before adding the color. The glue works as a resist and creates a wonderful effect. After coloring, I added glitter and rhinestones with the Glue Pen and used the MONO Multi Liquid Glue to attach clear cabochons to the bottom tangle.
 
I hope you enjoyed this …

If you enjoyed this post please follow us on

http://www.facebook.com/tombowusa and http://twitter.com/#!/tombowusa
 

“Life is Just…” July 20, 2012

Filed under: Uncategorized — mariebrowning @ 12:06 pm
Tags: , , , ,
The clear stamps from Inky Antics were so cute and so much fun to design with! The clear, simple outlines make them a joy to color with the Dual Brush Pens and very versatile when designing your project.
 
 
I used the “Cupcake Birdy” a little differently, using the cupcake top upside down for a nest. The HoneyPOP paper was super easy to use and makes the cards POP! Along with the Foam Tabs, you can make beautiful cards with an explosive surprise on the inside. I made the card so full of cherries coming out of the nest; I had to hold it closed with a bellyband and Fastener Tab.
 
The highlights on the cherries were added before coloring with the Glue Pen to create a resist. The feather texture on the birds was created using the indirect blending method and the brush tip of the blender pen stamping down the texture.
 
 
I then played with the “Teacup Mousies” clear stamp set from Inky Antics and created these little teabag cards. Again using the Dual Brush Pens to color and blend using the indirect blending method. The Stamp Runner Permanent Adhesive put everything together and the little cards closed with a small piece of Fastener Tab. The Fastener Tabs are easy to cut into the size and shape you
need with out gumming up your scissors and provide a smooth, flat way to fasten a card.


I hope you enjoyed these cards as much as I enjoyed making them….

Be sure to hope over to the Inky Antics blog to see how much fun they had…

If you enjoyed this post please follow us on http://www.facebook.com/tombowusa and http://twitter.com/#!/tombowusa


“Ballon Girl” July 10, 2012

Balloon girl got a little carried away with her balloons but this card says ‘Thanks a Bunch’ for a good friend.
Tombow and Penny Black pair up with some fun techniques such as using the glue pen as a resist and 3-D effects with the foam tabs. The stamp from Penny Black is whimsical and fun, perfect for coloring brightly with the Dual Brush Pens

Materials from Penny Black: Mix & Match Papers, Blue Lagoon, La soirée Stamp, Block Thank You Stamp

Materials from Tombow: Dual Brush Pens, Jelly Bean 10-set, (761 Carnation, 992 Sand, & 493 Reflex Blue) Permanent Stamp Runner, Foam Tabs, Glue Pen

Using a dye-based ink pad, stamp multiple images of the balloons. The sample used had 5 stamped balloon images. You will also need an extra tote bag stamped out.


For the green swirl design on a blue background for the tote, color the tote with the green Dual Brush Pen. Using the Glue Pen as a resist, draw on the swirls. When dry, color the tote blue using a blended technique. Cut out the tote bag and the flower, apply permanent adhesive to the top and a small foam tab at the bottom. When adhered in place, the tote will have a dimensional flare at the bottom.


The balloons were done in a similar fashion using the glue pen as a resist. Some of the balloons are colored yellow and a simple design added with the Glue Pen. Add some designs on some uncolored balloons and leave some blank. Use the warm pinks, oranges and corals from the Jelly Bean set to color the balloons. Cut the balloons out and use the Permanent adhesive and Foam Tabs to adhere to the card. Add tiny rhinestones as the highlights using the Glue Pen.