Marie Browning

"Inspiring and honoring creativity"

Blog Hop with Precious Remembrance Shop – Thank You Card September 6, 2014

IMG_1075

I hope you are ready from some Fun Ideas and Great Prizes this week from TombowUSA  and Precious Remembrance Shop. If you’re here from the Tombow Blog, then you’re in the right place! We have three different designs each for you so make sure you follow the blog hop Friday, Saturday and Sunday for tons of inspiration!

IMG_1074

I used the Thanks Stamp Set from the Precious Remembrance Shop and some cardstock from DCWV Sunshine Stack. I loved the simplicity  of this card, and the stamps add that perfect touch of class.I used the Dot Adhesive runner for all the paper panels and Foam Tabs to lift up the ‘thanks’ panel and banner tags. A green Dual Brush Pen edged the panels and card for the finishing touch.

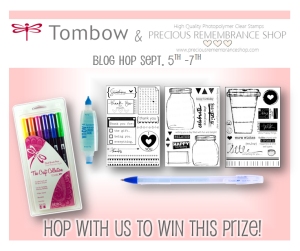
PR_hop

The Prize will include amazing products from BOTH Companies!

From Tombow the Winner will receive:
· Dual Brush Pen Set, 6 Retro
· MONO Aqua Liquid Glue
· MONO Glue Pen

From Precious Remembrance Shop the Winner will receive:
· Coffee Love Stamp Set
· Oh So Fun Stamp Set
· Thanks Stamp Set

In order to qualify to win this AMAZING prize you must:

1. Comment on each of the Design Team Member’s blog post AND the Company Blog post.
2. Like BOTH TombowUSA and Precious Remembrance Shop on Facebook.

The Winner will be announce on Tuesday September 9th. Now go to Rosemary Dennis’s blog to see what she has created for today!


Blog Hop with Precious Remembrance Shop – Balloon Flower Cards September 5, 2014

IMG_1069   

I hope you are ready from some Fun Ideas and Great Prizes this week from TombowUSA  and Precious Remembrance Shop. If you’re here from the Tombow Blog, then you’re in the right place! We have three different designs each for you so make sure you follow the blog hop Friday, Saturday and Sunday for tons of inspiration! 

IMG_1067

I used the Oh So Fun Stamp Set from the Precious Remembrance Shop and some cardstock from DCWV Sunshine Stack. I loved the cute jar stamps that were stamped out and colored with the #312 Dual Brush Pen – the perfect jar color! I used the Dot Adhesive runner for all the paper panels and Foam Tabs to lift up the flowers and ‘celebrate’ panel. The flowers were made by gluing a flat clear marble onto a punched out flower with Mono Multi Liquid Glue. I also added a little silver bullion wire into the jar for extra bling! A black Dual Brush Pen added the flower stems for the finishing touch. 

PR_hop

The Prize will include amazing products from BOTH Companies! 

From Tombow the Winner will receive:
· Dual Brush Pen Set, 6 Retro
· MONO Aqua Liquid Glue
· MONO Glue Pen

From Precious Remembrance Shop the Winner will receive:
· Coffee Love Stamp Set
· Oh So Fun Stamp Set
· Thanks Stamp Set

In order to qualify to win this AMAZING prize you must:

1. Comment on each of the Design Team Member’s blog post AND the Company Blog post.
2. Like BOTH TombowUSA and Precious Remembrance Shop on Facebook.

The Winner will be announce on Tuesday September 9th. Now go to Rosemary Dennis’s blog to see what she has created! 


Sticky U Project with Xtreme Adhesive August 25, 2014

Filed under: Mixed Media,Tombow Adhesives — mariebrowning @ 3:01 am
Tags: ,

IMG_1001

For my Sticky U project using Tombow’s Xtreme Adhesive I decided to really test it on different surfaces. I have been wanting to decorate a mason jar with an forest bird theme, so I started by filling my jar with moss, a plastic egg and a birdcage with a pretty verdigris patina. 

Now to test the Xtreme! Ribbon to Glass: perfect! I applied the Xtreme to the ribbon and it was easy to attach instantly with a strong bond and no mess! 

IMG_1003

Trim to Metal: Perfect! I added a circle of burlap to the top be adding the Xtreme to the metal surface. For the lace I attached the Xtreme to the trim and then added it to the rim. On an open weave like this lace, the Xtreme only adhered to the lace, leaving the open spaces free of excess glue.

IMG_1004

Cork to Glass: Perfect! Trim to Ribbon and Cork: Perfect! Again, the Xtreme adhered to the Rick Rack with no excess on the edges! Perfect adhesion! 

IMG_1006

Paper to Cork and Paper to Paper: Perfect and Perfect! This was such a quick project as the adhesion for everything was quick and held strong from the get go! 

IMG_1007

My finished project! It’s going to live at my desk to remind me of my weekend walks/runs with my husband. Here’s a photo of my inspiration:

IMG_0932

Moss is a huge trend right now, and as you can see I am surrounded by it on Vancouver Island. However, I still buy it from the floral department at craft stores. Why? Moss contains hundreds of bugs that will hatch when you bring it indoors, you also destroy sensitive ecosystems by gathering it yourself. Better to buy it already treated and sensibly collected from logged areas. 

IMG_1020

Tombow’s Xtreme Adhesive gets a big thumbs up from me! 


Melissa’s Blog Challenge August 18, 2014

Melissa_birthday challenge

Melissa picked a Birthday Card for her challenge! Thanks for the easy challenge Melissa and a Happy Belated Birthday! Join the challenge by making your own card and be eligible to win: Xtreme Adhesive, Power Tabs and MONO Multi Liquid Glue! Go to the TOMBOW BLOG for all the details! I’m going to show you the Birthday Candle DoodleDab and a few card ideas to create with it!

IMG_0964

Here are the steps for the DoodleDab Candles and the Dual Brush Pen colors. You can, of course, choose to make any color candle with  the 96 different colors in the Dual Brush Pen palette! You will also need the Blending Kit to make the two toned DoodleDab teardrop strokes.

IMG_0967

IMG_0965

IMG_0966

Here are the card samples I made with the DoodleDabs! I did them on shiny photo paper for bright and colorful cards. Then the panels were attached to the colored card blanks using Dot Stamp Runner Adhesive and the small sentiment panels are attached using Foam Tabs for a dimensional look. Don’t forget to add candles to the envelope! So there you have it, very simple and quick cards using Tombow products!

Get busy and create your own card for the challenge! Voting will start MONDAY, AUGUST 25 and will end WEDNESDAY, AUGUST 27 


Blog Hop with Walnut Hollow August 15, 2014

Facebook-Post

Welcome to the Tombow and Walnut Hollow Blog Hop! If you just came from Jennie’s post you are on the right track! If not, you may want to start here to play along! 

IMG_0918

I am a huge fan of Walnut Hollow! They have beautiful wooden surfaces to decoupage and paint, like the recipe box I used here. This Basswood box is ready to use and made in the USA using sustainable wood. 

IMG_0921IMG_0922

I used Tombow’s Aqua Liquid Glue to cover the box with beautiful papers from the Burlap & Bouquets Collection from Fancy Pants Designs. The Aqua works extremely well for decoupaging paper onto wood. I simply cut the paper to size and then use the broad applicator to attach the papers for a smooth, wrinkle free bond. Talk about mess free, no brushes to wash! When dry, I use the Aqua to give the surfaces an all-over brushing. It dries clear and matte! The flowers motifs from the Burlap & Bouquets collection on the top of the box were applied the same way. COOK, EAT and BAKE using large alpha stickers from the collection were added when dry.  I also added a washi tape edge around the box rim for added embellishment. Don’t forget the final touches inside the box; recipe card dividers and a label with ‘FAMILY FAVORITES’ on the lid.

 IMG_0919

I used a Power Tab  to attach a clothespin to the lid for a handy recipe holder! 

Facebook-Post-prize

Here are the prizes that you can win! From Walnut Hollow a Shield Plaque, a Card Box and a Rectangular Serving Tray. From Tombow: Power Tabs, Foam Tabs and Xtreme Adhesive! Make sure to comment on all the projects to be eligible to win! Now go to Walnut Hollow to see what wonderful projects they have created! 


Blog Hop with Lily Criswell August 8, 2014

So happy to be blog hopping with guest designer Lily Criswell! Our amazingly talented guest is only 9 years old and already a seasoned designer! Play along and have a chance to win Tombow product! If you just came from Jennie’s blog, you are on the right track! If not you may want to start at the Tombow Blog. It’s also back to school time so Mom’s can celebrate by crafting this elegant pencil box – not for the children, it’s for you! 

IMG_0904I started by re-purposing a box I had. With some book pages and Tombow’s Aqua Liquid Glue I decoupaged on the sides and on the inside. Aqua Glue is a amazing glue for this purpose, and the build in applicator makes it mess free! I simply cut book pages to fit the sides and applied an layer of Aqua to attach. I also brushed on a coat of Aqua on top to give it a nice matte finish. Do you see the book page pencil? Yes, Aqua worked perfectly to cover the pencil as well! 

IMG_0905

I also added book pages on the inside – I didn’t worry about tears and wrinkles as I liked the distressed look! The ribbon handle and front label embellishment were added using Power Tabs for a strong, lasting hold. When dry I filled it with my essentials; Tombow Correction Tape, Xtreme Adhesive, Drawing Pencils and a Fudenosuke Brush Pen.  Now I’m all set to mark my fridge calendar with upcoming events!  

blank blackboard sign

Now to win a package of Soft Primary Irojiten Colored Pencils and Xtreme Adhesive please comment on all the Design Team’s projects as well as liking the TombowUSA Facebook page! Your next stop is Lily’s blog to see what she has created for you! 


Blog Hop with Ellen from Chilly Dog! July 25, 2014

Filed under: Cards,Dual Brush Pens,Tombow,Tombow Adhesives,Tombow Dual Brush Pen — mariebrowning @ 10:00 am

Another great blog Hop with a talented designer, Ellen from Chilly Dog! You can also win a fantastic Tombow prize for playing along! If you have come from Jennie’s Blog, you are on the right track! If not, you will want to start at the Tombow Blog! For this post I’m showing you how to draw a simple “Doodle Cat” that you can color using the Dual Brush Pen Bright Set! This is easy enough for the children to do, so give it a try!  

IMG_1830

Using the MONO Twin Permanent Marker, use the broad tip to draw the first two steps. Then with the fine tip, add the details. Keep the doodles to decorate the cat simple and large. Vary your cat to be large or small, fat or skinny! This pen NEVER bleeds into the Dual Brush Pens making it the perfect tool for drawing! 

IMG_0880

Color your cats with the Dual Brush Pens using the indirect coloring method. This method uses the Colorless Blending Pen and Blending Palette from the Blending KitThis coloring method gives the cats a nice graduated basecoat. Fill in the doodled details using the Brush markers at full strength for maximum color!

IMG_0880

If you look closely, you can see the white whiskers, created by drawing them on with the Glue Pen before adding the colors. I also used the Glue Pen to add transparent fine glitter to the details. 

IMG_0879IMG_0878

Here are two more card ideas done with the “Doodle Cat” design. This time, I glued on googly eyes using the Glue Pen. Have fun with this simple drawing project creating fun cards or bright framable drawings! 

bloghop_chillydog

This is the prize you can win from Tombow! Xtreme Adhesive, MONO Adhesive Permanent, MONO Adhesive Permanent Refill Value Pack, Stamp Runner Permanent and Stamp Runner Permanent Refill! 

Here’s How to win! Start at the Tombow Blog and comment on all the Design Team’s projects. Also, “like” TombowUSA and The Chilly Dog on Facebook! Your next stop is to see what Ellen at The Chilly Dog has created for you! 


Debbie’s “You Are My Sunshine”Challenge July 14, 2014

Debbie has put out a challenge of “You are my Sunshine” to create something for summer and yellow! I haven’t shown a new DoodleDab lately, so here is a Sunny Sunflower using Tombow products! 

IMG_0755

DoodleDabs are created with the Dual Brush Pens. The tough nylon tips stand up beautifully  to  ‘dapping’ the brush tip down to create the teardrop stroke. This stroke is all you need to learn to make over 40 different DoodleDabs! Simply follow the steps to make the sunflowers using 925 Scarlet, 025 Light Orange  and 195 Light Green Dual Brush Pens. 

IMG_0758

Here is a panel showing a sunflower sprouting up to a tall sunflower and a friendly ant waving hello!

IMG_0756

IMG_0757

Don’t forget to accent the front of your envelope with some sunflower DoodleDabs!  I used Foam Tabs to raise up the main panel, MONO Dots Adhesive to attach the panels and rick rack and a light brown Irojiten Pencil to edge all the panels.

Want to learn more DoodleDabs? Stay tuned, my book “Brush Marker Magic” Design Originals Publication will be out soon and includes oodles of step-outed DoodleDabs!

Debbie_sunshinechallenge

I would be TRILLED if you tried out the DoodleDab while creating your entry for Debbie’s “You are my Sunshine” challenge! Look what you can win from Tombow: Xtreme Adhesive, Power Tabs and Mono Adhesive Dots! 


Blog Hop with Tombow, DCWV, & May Arts June 23, 2014

Blog-hop+DCWV+MayArts+Tombow

Welcome to the Triple Threat Blog Hop with DCWV, May Arts and Tombow! All this week designers from these great companies will be sharing projects using DCWV’s Honey Chic stack, beautiful ribbon from May Arts and adhesives from Tombow.

If you have come here from Valerie’s Blog, then you are on the right track! If not, you can go back to any of the company websites and start the hop from there!

IMG_0678

I have designed three pages for the hop including some hints on adding ribbon and trims. On this page, diagonal striped cardstock was used as a base with coordinating papers from the stack. The cardstock panels and photo were first arranged using the Removable Adhesive to plan the page design. For the permanent bond, Permanent Adhesive was used.

IMG_0678

I attached teal satin ribbon using Xtreme Adhesive for a quick and secure bond. Multi Liquid Glue was used to glue small motifs from the paper under clear cabochons to create the floral embellishments. Multi dries quickly and crystal clear, perfect for this task.

IMG_0676

To manage the Light Blue Raffia Bow trim, I adhered it, right side down, to a scrap piece of paper using the Removable Adhesive. Then with the Multi Liquid Glue, I added a tiny drop of glue to each bow and let dry clear. It was then super easy to attach it exactly where I wanted it without any excess adhesive showing – a perfect solution for hard to attach ribbon and trims!

IMG_0679

It was fun to choose different papers from DCWV’s Honey Chic Stack, I was always able to match my  photos!

IMG_0679

The blue flat marble embellishments were done using the Multi Liquid Glue and the paper panels again arranged using the Removable Adhesive. With the Yellow sheer ribbon with butterflies, a strip of Xtreme Adhesive was added to the page and then the ribbon was ‘messy pleated’ in place. I also added the Green with polka dot ribbon and the yellow tulle gathered under the journaling panel with the Xtreme Adhesive. The final placement of the panels were adhered down using both Dots Adhesive and Foam Tabs.

IMG_0677

This final page used the same techniques. Xtreme for the flat ribbon, Multi to create the acrylic gem embellishments and the Multi glue technique for the diamond chain. I loved the cute canvas with bunnies ribbon and the sparkly diamond chain from May Arts Another notable hint is to use Aqua Liquid Glue on ribbon ends to prevent them from fraying! IMG_0677

Be sure to visit all the blogs today and leave comments for your chance to win some great prizes! Three lucky readers will win a Triple Threat prize pack of you own, including a stack from DCWV, a spool of ribbon from May Arts and Xtreme Adhesive, Power Tabs, Removable Adhesive and Fastener Tabs from Tombow. Winners will be chosen from comments throughout the week, so make sure you check back daily to increase your chances of winning! Also, please make sure you have popped on over to Facebook and “liked” each of the company pages (DCWV / May Arts / Tombow), because really, what’s not to like?!

Now, head on over to Rita’s Blog to see what kind of craftiness she has in store!


Blog Hop with Guest Designer Anna Wight June 13, 2014


Welcome to the Blog Hop with our talented guest Designer Anna Wight! If you just came from Jennie’s Blog you are on the right path! If not, you may want to start at the Tombow blog!

IMG_3609

For this blog I am going to show you a technique that uses both the Dual Brush Pens and Irojiten Colored Pencils. These two colorful products play well together and you get the benefit of quick color blocking with the markers and simple shading to create beautiful images with the colored pencils. This is a perfect project if you are a beginner to coloring your stamped images or Zentangle inspired drawings! Here I have started with a simple flower design filled with tangles drawn with the Mono Twin Permanent Pen.

IMG_3610

Next, use light colored Dual Brush Pens and the brush tip to simply fill in the main areas with color. Don’t worry about blending colors! Let these colors dry a few minutes before the next step.  The markers used here are: 703, 991, 603, 553, 126 and 195

IMG_3611Now using the Irojiten Colored Pencils, here I am using the Vivid Tones, shade in the drawing to give it depth. Start with using the same colors, for example, the red colored pencil on the pink parts. I then add blue for the shadows on all the parts to create deep shadows.

IMG_3591

Here are some more colorful examples using this technique! Quick color coverage provided with Light hues of the Dual Brush Pens, then controlled, easy shading using the Irojiten Colored Pencils!

Blog Hop_AW

The prize for this blog hop includes Xtreme Adhesive, Mono Adhesive Removable and Mono Aqua Liquid Glue!

In order to enter to win this prize from Tombow, please comment on all the Design Team’s projects this weekend! Now go to guest designer Anna Wight’s blog to see what she has created for you!